Showing posts with label lemon. Show all posts

January 9, 2015

Greens Galore Soup with Cayenne and Lemon

After a food-filled four days in California over the new year, I was ready for some greens. So I decided to make this soup I had recently saved which is basically just a ton of greens blended up with caramelized onions.  The result is a super fresh soup that I felt really good about eating!  

I liked this soup a lot more than I thought I would, and will probably end up freezing half of it because it made a lot of soup.  Another reminder to read a recipe carefully before you start to make it because I should have cut this in half based on the amount of liquids alone.  The small pinch of cayenne does not add a lot of heat, feel free to add more if you like spicy.

In any case, this soup is a wonderful kickstart to the new year and I hope you like it as much as we did!

Greens Galore Soup
Adapted slightly from Cookie and Kate
Serves at least 6
  • 2 Tbsp olive oil, plus more for garnish
  • 2 large yellow onions, chopped
  • 1 tsp salt, divided
  • 2 Tbsp plus 3 cups water, divided
  • 1/4 cup arborio rice, rinsed
  • 1 large bunch Italian kale (about 1 pound), thick ribs removed, leaves chopped coarsely.
  • 2 cloves garlic, minced
  • 10 ounces of gently packed spinach or baby cooking greens, such as chard (I used two 5 oz tubs of OrganicGirl's Super Greens which is a mix of spinach, chard, and other baby greens)
  • 4 cups broth (I used chicken, but veggie would make this dish vegan!)
  • 1/4 tsp of cayenne pepper (or more to taste)
  • 1 1/2 Tbsp lemon juice (or more to taste)
  • Serve with (optional): Cooked rice and a can of drained and rinsed chickpeas
First, start the onions caramelizing. Heat 2 Tbsp olive oil over medium-high heat in a large skillet.  Add the chopped onions and 1/4 tsp salt.  Cook, stirring frequently, until the onions are starting to brown, about 5 to 10 minutes.  Reduce the heat to low, add 2 Tbsp water, and cover. Cook until the liquid is greatly reduced and the onions are a rich caramel color, this should take about 20 to 30 minutes. Stir occasionally, and each time replace the cover on the pan.

While the onions are cooking, combine 3 cups water, 3/4 tsp salt, and the arborio rice in a large soup pot or dutch oven.  Bring to a boil.  Reduce the heat to a simmer and cover.  Cook for 15 minutes. 

(If you want to have this over Jasmine rice and with chickpeas like we did, start the rice now. 1 1/2 cup water and 1 cup jasmine rice with a pinch of salt. Bring to a boil and then simmer for 18 minutes.  If you have a small strainer that fits inside your pan that you used to rinse the chickpeas, when the 18 minutes are up set that strainer on top of the hot rice pot and put the lid over it to warm up the chickpeas!)

Add to the soup pot the chopped kale and the minced garlic.  When the onions are caramelized, stir them into the soup pot along with the baby greens, broth, and cayenne pepper. 

Return the pot to a simmer and cook for about 5 minutes until the greens are slightly wilted but still bright green.

Puree the soup with an immersion blender or in batches in a regular blender until smooth. Stir in the lemon juice.  Taste and add more salt, lemon, or pepper to taste. 

You can eat this as is for a super healthy green soup, or on top of rice and chickpeas for a heartier dinner.  Drizzle with olive oil and enjoy! This looks swampy, but me and my love agree, this soup tastes much better than it looks!

2015-01-04 Greens Soup 005

August 6, 2014

Stuffed Eggplant with Pork

This is not exactly a summer meal but it turned out so good I decided to post it anyhow.  My mom and I have a standing Saturday date at the farmer's market and this time of year in the PacNW it's a bounty that is all for the taking.  Every single stand looks like a picture out of a cookbook.  I had a hard time restraining myself.  One of the things I did end up with in my basket was some beautiful small eggplants. I always feel good buying these because they are DP's favorite vegetable.  To which I had two people exclaim to me on that same day, "Who's favorite vegetable is eggplant?!?"  He's an odd bird that one.  Fortunately, I like eggplant too so I was on my way to something good for dinner.

In the summertime I feel you can't go wrong with veggies and protein so I thought a meat stuffed eggplant sounded great.  I ended up finding a recipe out of the beautiful cookbook Jerusalem.  This one was for lamb stuffed eggplant and I'm not such a huge lamb fan, unlike Michelle.  So I substituted ground pork in its place.  I made a few other small adjustments.  Next time I think this would be even lovelier with a nice yogurt sauce spooned on top.  Come fall I'll be giving it another go around. Here is the recipe as I made it.

Stuffed Eggplant with Pork
adapted from Jerusalem cookbook
  • 3 small eggplants, halved lengthwise
  • 3 tablespoons olive oil
  • 1 teaspoon ground cumin
  • 1 tablespoon hungarian paprika
  • 1/2 tablespoon cinnamon
  • 1 medium onion, finely chopped
  •  1/2 ground pork or any other ground meat you prefer
  • 3 tablespoons pine nuts
  • 3/4 cup fresh parsley, minced
  • 2 teaspoons tomato paste
  • 1 1/2 teaspoons sugar
  • 1/2 cup water
  • 1/2 tablespoon tamarind paste
  • 1/2 tablespoon lemon juice
  • 2 cinnamon sticks
  • Salt and freshly ground pepper
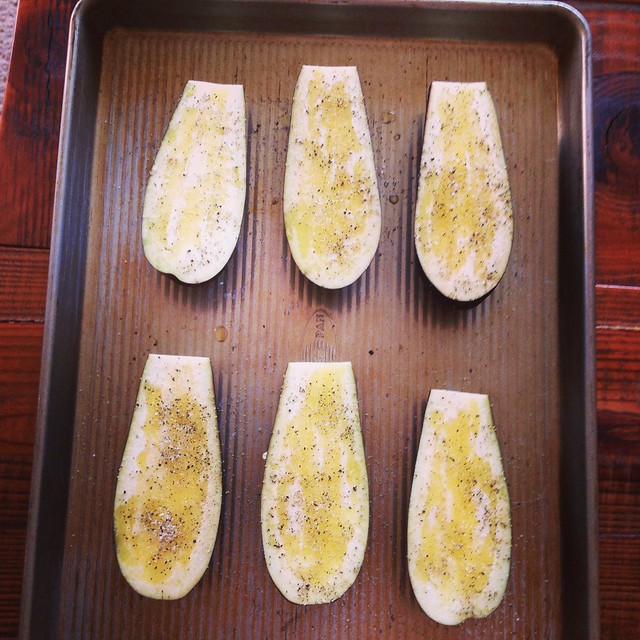
Preheat the oven to 425.  Place the halved eggplants in a roasting pan with sides and brush with 2 tablespoon of the olive oil.  Sprinkle with salt and pepper and let roast for 20 minutes, until golden brown and then allow to cool slightly.

While the eggplants roast start making the filling.  Heat the remaining 1 tablespoon olive oil in a medium frying pan over medium heat. Mix together the cumin, paprika and cinnamon and add half of this mixture to the pan, along with the onions.  Cover over medium-high heat for about 8 minutes. stirring often.  Add the ground meat, pine nuts, parsley, tomato paste, 1 teaspoon of the sugar and salt and pepper.  Continue to cook and stir for another 8 minutes or until meat is cooked through.

Place the remaining spice mix in a bowl and add the water, lemon juice, tamarind paste, cinnamon sticks, a sprinkle of salt and the remaining sugar.  Stir well.

Reduce the oven temperature to 375.  Pour the spice mixture into the bottom of the pan.  Spoon the meat mixture into each eggplant, heaping.  Cover tightly with foil and return to the oven for 1 1/2 hours.  Twice during cooking baste the eggplants with the sauce and add more water if it starts to dry out.  The eggplants should be completely soft at the end.  Serve warm or even at room temperature.

2014-07-28 18.33.26-1

I totally failed at taking a final picture - whoops.


April 14, 2014

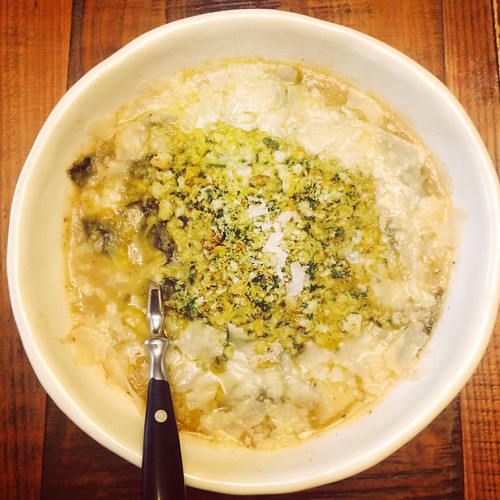
Charred Cauliflower, Potato and Kale Soup with Gremolata Breadcrumbs

I know what you're thinking.  That this recipe sounds either too boring or exactly like something you've made before.  But hear me out because I happen to think this is one of the most perfect soups I've ever made.  That's a bold statement, yes, but it's true. 

When I think of my most perfect soup I have a lot of items that need checking off the list.  First, it must be fairly easy because let's be real here, soup should not be something that you slave for hours over. Which in and of itself might be why it's one of the more perfect dinners to make.  Then I want it to be healthy, lots of veggies and not too much fat.  But at the same time it needs to be rich and interesting and flavorful.  Then, and I know this makes me sound crazy, but I want the soup to be creamy and have some bite to it all at the same time.  I am one demanding soup eater.  But this recipe, well it has it all.  It even has just the right amount of spice to it as well.  Have I hooked you yet?  I hope so because I waited until the end of this post to tell you that this recipe is also vegan and gluten free.  Hook, line and sinker.

Below is the recipe as I made it but if you don't care about being vegan I think adding some ground sausage to the recipe would work marvelously.  Just brown the meat as the very first step, set it aside, and add back in at the very end.  You can use the fat rendered from the sausage in place of the oil to char the cauliflower in.  And also, I used gluten free bread for the gremolata because I had some left over but regular day old bread works just as well here.  Enjoy!

Smoky Charred Cauliflower, Kale and Potato Soup
adapted from here

  • 2 tablespoons olive oil
  • 1 small head of cauliflower, cut into 1 inch pieces
  • 1 medium yellow onion, diced
  • 3 cloves garlic, minced
  • 2 chipotle chiles packed in adobo sauce, finely chopped
  • 2 quarts veggie broth (or any other broth you like)
  • 2 lbs of yukon gold potatoes, cut into 2 inch pieces
  • 1/2 lb lacinato kale, thick stems removed and julienned
  • 2 bay leaves
  • salt and pepper to taste
Heat olive oil in dutch oven over high heat.  Add cauliflower and cook, stirring often until charred on most sides, about 10 minutes.  Reduce heat if it starts to burn or smoke.  Reduce heat to medium low and add onions.  Cook until soft and translucent, about 2 minutes.  Add garlic and chipotles and cook 2 more minutes.  Add half of broth and bring to a boil.  Cook until cauliflower is soft, about 5 minutes.  Using a hand blender puree mixture completely until all chunks are gone.  Add remaining broth, potatoes, kale and bay leaves.  Bring to a boil over high heat, reduce to a simmer and cook until potatoes can be easily smashed, about 30 minutes.  Remove bay leaves and smash potatoes with a spoon to your liking.  Serve with the gremolata below, and maybe some Parmesan cheese if you'd like.

Gremolata Breadcrumbs
  • 1/2 loaf of stale crusty bread, cut into cubes
  • 2 teaspoons of olive oil, or more as needed
  •  1 large garlic clove
  • 1 teaspoon lemon zest
  • 1 tablespoon minced parsley
Add bread to a food processor and process until it turns to breadcrumbs.  Add garlic, lemon zest and parsley.  Pulse until mixed in and chopped fine.  With the processor on slowly stream in olive oil until bread crumbs are coated but not drenched. 

2014-04-01 19.28.59-1


February 6, 2014

Mushroom Barley Soup + A Thickening Trick

I was surprised that we haven't posted a classic mushroom barley soup yet.  Mushrooms being quite famous around these parts, in that Michelle and I often have long conversations regaling their merit.  DP also happens to be a huge fan so when anything has mushrooms, or mushrooms can be added, we know it's going to be a hit.  Mushroom barley happens to be one of my favorite soups because it's so simple but really hearty and filling as well.  Because there's no meat it also feels healthy and light.

I found a recipe that looked good on Saveur's site.  What appealed to me most about it was the finish with lemon; I love that touch in most anything to give the dish a brightness and a small hit of acid at the end.  However, I could tell that this soup was quite broth-y with 8 cups of stock and also the addition of the mushroom water from soaking the dried mushrooms.  So I decided to use one of my favorite tricks on thickening soups or even sauces at the very end of cooking - a Beurre ManiĆ©.  This method works essentially the same as a roux however you don't need to cook the fat and flour separately and can just knead the two together.  Also I've read that a roux can lose its thickening ability over long periods of cooking time so a beurre manie works a lot better in soups.  I like to use the pestle from my mortar and pestle set and work it together in a small dish.  A fork also works just great for this as well.  Just make sure you're working with softened butter instead of melted.  I like to nuke my butter for 20 seconds if I don't have any pre-softened. 

This soup with the addition of the thickener turned out so wonderful.  Adding the butter gave it a richness and then the lemon brightened the whole soup up to create a great balance.  I really loved it and will keep this as my go to mushroom barley from now on.  I served it with some garlic bread loaded with fresh garlic, olive oil, fresh parsley and S&P. And some red wine, natch. All in all a great winter meal!

Mushroom Barley Soup
adapted from Saveur

1 oz. dried porcini mushrooms (I used shiitake because my grocer was out of porcini)
1/4 cup olive oil
8 garlic cloves, finely chopped
2 ribs celery, finely chopped
2 medium carrots, finely chopped
1 large yellow onion, finely chopped
1 lb. white button mushrooms, thinly sliced
1/4 cup sherry
8 cups beef stock
1/2 cup pearl barley
2 tsp. fresh thyme
2 tbsp. lemon juice
Kosher salt and black pepper, to taste
fresh parsley, for garnish

 Beurre ManiĆ©
3 tbsp. unsalted butter, softened
3 tbsp. unbleached flour

1.  Place dried mushrooms in a bowl and cover with boiling water.  Cover the bowl with a lid and let sit for 30 minutes.  While these are brewing chop up your veggies and garlic.  After 30 minutes take the rehydrated mushrooms out with a slotted spoon and finely chop.  Pour soaking liquid through a fine mesh sieve into another bowl, leaving a small amount to retain any dirt or sediment.

2.  Heat oil in a large soup pot or dutch oven over medium-high heat.  Add garlic, celery, carrots and onion; saute until soft, about 5 minutes.  Add re-hydrated mushrooms and sliced button mushrooms; saute until liquid is released and evaporated, about 14 minutes.  Add sherry and cook until evaporated, about 2 minutes.  Add reserved mushroom water, beef broth, barley and thyme and bring to a boil. Reduce heat to medium-low and cook covered for about 30 minutes or until barley is tender.  Prepare beurre manie by blending together butter and flour in a small bowl until fully incorporated.  Add to soup pot at the very end of cooking and mix until melted.  Allow to thicken for a few minutes then add lemon juice.  Ladle into bowls and garnish with parsley.

IMG_1962[1]


January 29, 2014

Mulligatawny

Mulligatawny soup is a great soup for leftovers.  The recipe I found was one of those ideas on what to do with leftover Thanksgiving turkey. I didn't have leftover turkey in late January (god forbid) but what I did have was a lot of similar ingredients to the recipe already in my pantry. So I ended up taking this soup and really making it fit what was in my cupboard.

The key to a good mulligatawny is the acidity and the warm Indian spices.  The spices are what I would say define this soup.  However the rest of the elements can be open to interpretation.  I ended up using the traditional lemon and granny smith apple to bring the acidity to the soup but I saw recipes that omitted the apple and just had lemon.  I think subbing in lime would work just as well too if that's what you had on hand.  Also, the protein can be chicken or turkey but you can use whatever cuts you prefer.  Chicken is traditional but using slightly dried out turkey from Thanksgiving leftovers is a perfect option to bring back to life in this soup.

The other element I played with was the grain.  The recipe suggested basmati rice but I used red lentils instead because I had just the amount needed on hand.  The key if you choose to use lentils is to use the red/orange ones (like these ones) because traditional lentils won't cook up as fast as you need them to in this recipe.  So go forth with this knowledge and use what you got and make one hell of a good winter soup, just don't sub out the spices or you'll regret it.

Mulligatawny Soup
adapted heavily from this recipe

4 tablespoons of olive oil
1 medium yellow onion, medium dice
1 medium Granny Smith apple, medium dice
2 medium carrots, medium dice
5 garlic cloves, finely chopped
1/4 cup all purpose flour
1 tablespoon curry powder
1 tablespoon garam masala
1/2 teaspoon cumin
1/8 teaspoon ground cloves
6 cups of chicken stock (we used homemade)
2 lbs chicken boneless skinless chicken thighs
1 1/2 cups red lentils
1 (14 oz.) can unsweetened light coconut milk
1/4 cup fresh squeezed lemon juice
1/2 teaspoon finely grated lemon zest
cilantro leaves for garnish, we also added some avocado on top

1.  Preheat oven to 425 degrees. Put chicken thighs in a casserole dish, season with salt, pepper and 2 tablespoons of olive oil.  Roast chicken in the oven until temperature reaches 165 degrees internally.  Remove from oven and allow to cool.  Once cool, dice up into small bites.
2.  Heat other 2 tablespoons of oil in a large dutch oven over medium heat.  Add onions and allow to cook until soft, about 3 minutes.  Add apple, carrots and garlic and season with salt and pepper.  Saute until apple is tender and onions are translucent, about 5 minutes.
3.  Sprinkle flour, curry powder, garam masala, cumin and cloves over vegetable mixture.  Stir until fragrant and flour has cooked down, about 2 minutes.
4. Slowly add stock and stir until flour/spice mixtures is all dissolved.  Bring to a simmer and cook until vegetables are soft, about 10 minutes. At this point I chose to use my immersion blender and blend these ingredients together before adding the other meat and lentils.  The original recipe didn't say to but I didn't love the idea of eating chunks of cooked apple.  I'll leave you to make the call.
5.  Add diced chicken, lentils, coconut milk, and lemon juice and return soup to a simmer for about 10 minutes.  Stir in lemon zest and season with additional salt and pepper to taste.  Server immediately topped with cilantro leaves and avocado (if using).

We also bought some pre-made naan at the store for dipping.  Next time I'd love to make some of my own naan at home but since it was a weeknight I decided to choose the quick options.

I made a Vine video for this but unfortunately accidentally erased it so all I have is this pretty picture of the final product.  Enjoy!

IMG_1928[1]


April 5, 2011

Lemon Rolls with Cream Cheese Lemon Thyme Glaze

There were a million things pointing me towards making these sweet wonderful rolls. First off, I planted my first herb garden this last weekend! I'm pretty excited about it and I keep smiling every time I walk into my kitchen and see a window sill of fresh herbs smiling back at me. I've managed to use them in just about everything I've made since then but the one that has by far stolen me away is the lemon thyme. Just rubbing your fingers on it leaves the beautiful refreshing smell of lemon on them. It doesn't get much better than that. Secondly, I ran across a recipe for these lemon rolls on The Kitchn that I remembered I had bookmarked some time ago so I stocked up on lemons at the grocery store the very same day.

Those lemons came in handy later that day when I started feeling sick. I must've had about 15 lemon, hot water and honey drinks over the next 24 hours trying to chase the bug away. But alas, I'm home sick today with nothing to do but bake to make me feel better. I realized while making these that yellow is one of my favorite colors and I sure do have a lot of it in my kitchen decor. It's a brighten your day kind of color. The next thing you know I'm stumbling across this post on Poppytalk alerting me that today was in fact declared a day of yellow for Spring Colors Week. Sometimes when you get a good idea it doesn't take a lot of convincing to carry it through but it sure does help when the universe is there to back you up. So, here's my own little tribute to yellow.

I made the recipe as it was posted but I added some fresh lemon thyme to the cream cheese glaze. I also modified the lemon amounts a bit as I think my glaze and filling were a bit too wet and it needed to be adjusted into measurements instead of just whole lemons.

Sticky Lemon Rolls with Lemon Cream Cheese Glaze
Makes 12 large breakfast rolls

Lemon Roll Dough
1 envelope (0.25 ounces, or 2 1/2 teaspoons) active yeast

3/4 cup milk, warmed to about 100°F (warm but not hot on your wrist)
1/2 cup (1 stick) unsalted butter, very soft
1/4 cup white sugar
2 teaspoons vanilla extract
4 1/2 cups flour
1/2 teaspoon salt
1/2 teaspoon nutmeg
2 eggs
2 tablespoons of grated lemon zest
(about 1 lemon)

Sticky Lemon Filling
1 cup sugar
1/4 teaspoon freshly-ground nutmeg
1/2 teaspoon powdered ginger
3 tablespoons unsalted butter, very soft
1/4 cup fresh lemon juice
2 tablespoons grated lemon zest (about 1 lemon)

Lemon Cream Cheese Glaze
4 ounces cream cheese, softened
1 cup powdered sugar
1/2 cup fresh lemon juice
2 tablespoons fresh lemon thyme
2 tablespoons grated lemon zest for garnish
(about 1 lemon)

Make the dough:
Zest and juice the lemons. Divide the zest into three parts. Divide the juice into two parts, and set aside.

In the bowl of a stand mixer sprinkle the yeast over the warmed milk and let it sit for a few minutes. With the mixer paddle, stir in the softened butter, sugar, vanilla, and one cup of the flour. Stir in the salt, nutmeg, and one part (1/3) of the lemon zest. Stir in the eggs and enough of the remaining flour to make a soft yet sticky dough.

Switch to the dough hook and knead for about 5 minutes, or until the dough is elastic and pliable. (If you do not have a stand mixer, stir together the ingredients by hand, then turn the soft dough out onto a lightly floured countertop. Knead the dough by hand for 5 to 7 minutes, or until the dough is smooth, pliable, and stretchy.)

Spray the top of the dough with vegetable oil, and turn the dough over so it is coated in oil. Cover the bowl with plastic wrap and a towel and let the dough rise until nearly doubled — about an hour.

Make the filling:
In a small bowl, mix the sugar with the nutmeg and ginger, then work in the second part of the lemon zest (1/3) with the tips of your fingers until the sugar resembles soft sand. Slowly pour in one part of the lemon juice, stirring. Stop when the sugar and lemon juice form a wet, clumpy mixture. (You may use all of the reserved half of the lemon juice; you may stop before completely adding that half of the lemon juice.)

Assemble the rolls:
Lightly grease a 13x9 inch baking dish with baking spray or butter. On a floured surface pat the dough out into a large yet still thick rectangle — about 10x15 inches.

Spread the dough evenly with the 3 tablespoons of softened butter, then pour and spread the lemon-sugar mixture over top. Roll the dough up tightly, starting from the top long end. Stretch and pull the dough taut as you roll, to keep the lemon sugar firm inside. Cut the long dough roll into 12 even rolls. Pinch the bottom of each roll closed and place each one, open and cut side up, in the prepared baking dish.

Cover the rolls with a towel and let them rise for an hour or until puffy and nearly doubled. (You can also refrigerate the rolls at this point. Cover the pan tightly with plastic wrap, and place it in the refrigerator for up to 24 hours. When you are ready to bake the rolls, remove the pan from the fridge, and let them rise for an hour.)

Heat the oven to 350°F. Place the risen rolls in the oven and bake for 35 minutes or until a thermometer inserted into a center roll reads 190°F.

Make the glaze:
While the rolls are baking, prepare the glaze. In a small food processor (or with a mixer, or a sturdy whisk), whip the cream cheese and the lemon thyme until light and fluffy. Add the remaining lemon juice and blend until well combined. Add the powdered sugar and blend until smooth and creamy.

Finish the rolls:
When the rolls are done, smear them with the cream cheese glaze, and sprinkle the final remaining lemon zest over top to garnish. Let cool for at least 10 minutes before serving, but do serve while still warm.

lemonthymeplant
My Inspiration


lemons!gratedlemon
A little before and after

teatowel
My pretty tea towel with the dough rising

buns
Makes my mouth water just looking at 'em

onebundone
Another before and after

June 14, 2010

Infallible Lemon Blueberry Muffins

Alright, people. I've been on hiatus, yet again, and during that time it seems I lost my ability to bake. And not just to bake well, but to bake the easiest thing of all, what some may call my specialty - the muffin. Luckily enough for me I managed to pick what would appear to be a recipe so good it's impossible to mess up. Because I tried, not once, but twice. You see, when a recipe tells you to cream the butter and sugar, don't forget the sugar until the last minute, when upon licking the beater it occurs to you that something is off. And certainly don't add the lemon juice in early instead of said sugar, making it nearly impossible to cream the butter. But if you do both of those things, most definitely do them with this recipe. Because despite all that drama I still managed to put forth muffins so lemony and crumbly that I couldn't eat less than two in one sitting. Six times in a row.

Alice’s Blueberry Muffins

From Sweet Savory Life

Ingredients:

4 tablespoons butter, softened

2 tablespoons vegetable oil

1 cup of sugar

zest and juice of 1 lemon

2 eggs

2 tsp. of vanilla extract

1/2 cup of sour cream

2 cups of AP Flour

2 tsp. of baking powder

1/2 tsp. of salt

1.5 cups of fresh or frozen blueberries

*optional 1/4 cup turbinado sugar/sugar crystals

Directions:

Preheat oven to 350 degrees. In a medium mixing bowl, cream butter, oil, lemon zest, and sugar for 3 minutes until light in color and creamy. Add eggs, sour cream, lemon juice, and vanilla beating for an additional 2 minutes. Add salt, baking powder, and all-purpose flour gently mixing everything for an additional minute until everything is fully incorporated, approx. 2 minutes. Batter will be nice and thick. Gently fold in blueberries and pour batter into muffin tin lined with paper cups 3/4 cup full. Top each muffin with a sprinkle of turbinado sugar or sugar crystals.Bake for 30 minutes or until done. Makes 12 regular sized muffins.

DSC00691

DSC00698


May 11, 2009

Lemon/Lime-Not just for Sprite anymore

After Cinqo de Mayo we ended up with 2 leftover bags of lemons and limes. There was no way I was going to be able to drink enough cheap beer to mow through all of those before they calcified so I decided a citrus dessert was in order. With a little bit of research and a little bit of kismet I came across a recipe for Lemon Lime Cookies via Culinary in the Desert. At first I didn't think much of these cookies but let them sit overnight so all that icing can soak in and man! So lemon-limey, so refreshing, just perfect. I brought what wasn't consumed upon the roomies discovering these to a Naked Ladies party and they were a hit there too!

Consensus: make these ASAP.

Lemon Lime Cookies
Source: Culinary in the Desert

For the cookies

2 cups all-purpose flour
1/2 teaspoon baking soda
1/2 teaspoon salt
8 tablespoons unsalted butter, softened
1/2 tablespoon fresh grated lemon zest
1/2 tablespoon fresh grated lime zest
1 cup granulated sugar
1 large egg
1 tablespoon fresh lemon juice
1 tablespoon fresh lime juice
1 teaspoon vanilla

For the glaze

2 cups confectioners' sugar
1 tablespoon fresh grated lemon zest
1 tablespoon fresh grated lime zest
2 1/2 tablespoons fresh lemon juice
2 1/2 tablespoons fresh lime juice

To prepare the cookies

Preheat oven to 350 degrees.

In a medium bowl, whisk together flour, baking soda and salt.

In a large bowl, beat together butter, sugar and zests until creamy. Beat in egg, vanilla and juices. Gradually mix in flour just until combined.

Using a tablespoon cookie scoop, drop dough onto baking sheets lined with parchment paper. Place into the oven and bake until edges are golden, about 15 to 20 minutes. Remove from the oven and let cookies cool for 2 minutes before transferring them to a wire rack to cool completely.

To prepare the glaze

In a medium bowl, whisk together confectioners' sugar, zests and juice until smooth. Spoon over the cookies and let set for about an hour to firm up.

Makes about 24 cookies.

20090508_cookies_003

Drippy.