Showing posts with label carrots. Show all posts

December 30, 2014

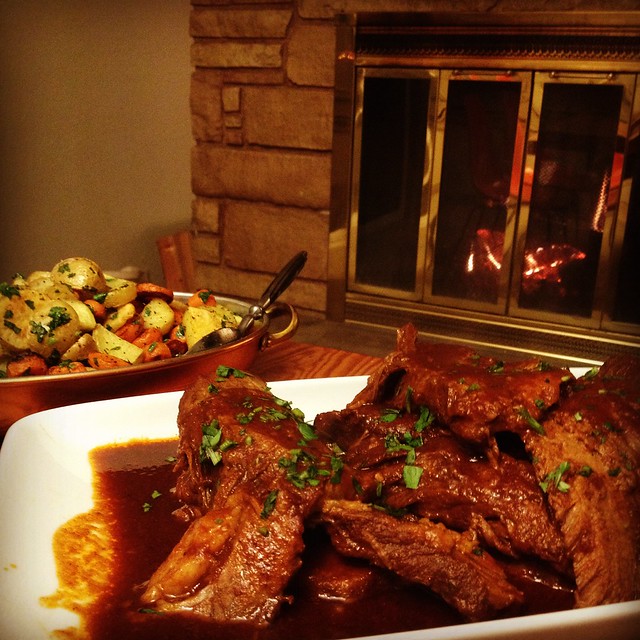
Sweet and Sour Beef Brisket - 100th Post!

Happy 100th post to us!  We've been through our ups and downs with this blog over the years but Mostly Soup is still kicking.  Thanks to all those who read our stuff.  We like keeping this blog up for a reference journal of our own accord and those who follow along are icing on the cake.  So raise a glass to you - THANK YOU!

I made this classic beef brisket when the rain first started in and paired with some red wine and a warm fire it was just the trick for coziness.  It would be the perfect dish to make for a stay at home New Years Eve celebration.  It feels decadent and rich but is really hands off and easy.  I didn't feel the need to make any sort of adjustments to this recipe; it was great just the way it is.  Just a heads up that you do need to start this recipe the night before you plan to serve it, or in the morning time so you have the whole day to rest it.

I roasted up some carrot and potato "coins" to go along with it.  If you have the Smitten Kitchen cookbook this recipe is in there but it's as easy as cutting up the potatoes and carrots in coin shapes and roasting until done with your favorite seasonings.

In any case I hope you get to try this out before winter is over.  Have a very happy New Years (with or without this brisket)!!

Sweet and Sour Beef Brisket
not adapted at all from Smitten Kitchen cookbook

•  4-to-5-pound (1¾ to 2¼ kg) piece beef brisket
•  1½ teaspoons kosher salt, plus more for initial seasoning of meat
•  Freshly ground black pepper
•  1 cup (235ml) beef stock
•  3 tablespoons (50 grams) tomato paste
• 1/4 cup (50 grams) brown sugar, light or dark
•  4 teaspoons paprika
•  2 teaspoons Worcestershire sauce
•  1/8 teaspoon red chili flakes
•  1 teaspoon garlic powder
•  2 tablespoons (15 grams) onion powder

Season the meat generously on both sides with salt and pepper.  Whisk all of the remaining ingredients together in a bowl.  Preheat your oven to 350 degrees.  Place the meat in a dutch oven (or any other sturdy pot with a lid) and pour the sauce over it.  Put the lid on and roast for 3 hours, or tender enough to pull apart with a fork.

Chill the entire dish in the fridge for several hours or up to one day.  This resting time will enhance the flavor and texture of the meat.  An hour before you are ready to serve it heat the oven to 300 degrees and remove the dish from the fridge.  Skim off any fat that has congealed at the top of the meat.  You can leave some if you like but I skimmed it all for a less oily finish.  Remove the meat and slice into 1/4-1/2 inch slices and put back into the sauce in the pan.  Replace the lid and put into the pre-heated oven.  Reheat until the sauce is bubbly around the edges.  Serve immediately with sauce on the side to pour or spoon over meat.
2014-11-10 19.45.59-1

December 29, 2014

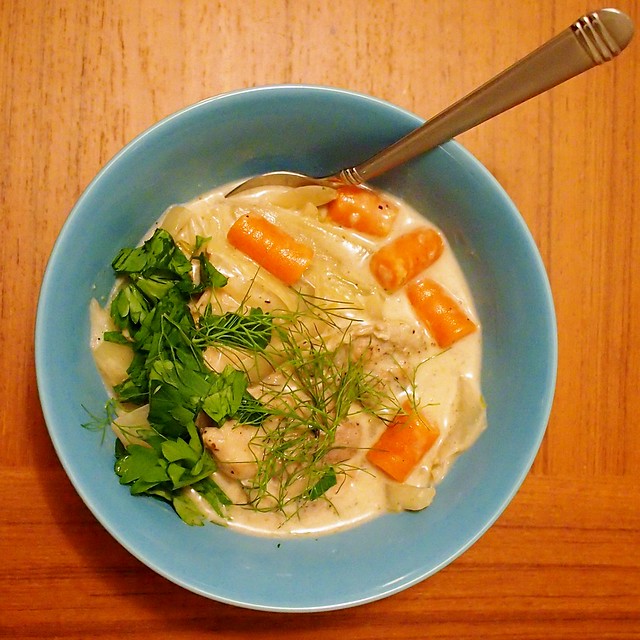
Quick-Braised Chicken with Fennel and Endive

It is officially winter, and I have comfort food on the brain.  I cannot for the life of me figure out how I found this recipe, but it was probably from some one-pot meal round-up which I always love because who wants to clean more than one pot?  

Other things that I liked about this: I had never used endive in a soup before, I am slightly obsessed with fennel, and I love anything with white wine and cream, so this was a no brainer.  

This actually isn't a soup, but because I used boneless/skinless chicken thighs, I probably should have used more or reduced the liquid a bit more.  We ate it just as is with some bread, but it would be great over mashed potatoes, pasta, or rice to soak up the yummy juices.  If I make this again, I would add some mushrooms and saute some of the veggies a bit, maybe caramelize the fennel.  The endive was great, it held a bit of crunch and surprised me!

In any case, this was super tasty and really hit the spot, as far as winter comfort goes.  Here is the recipe as I made it.

Quick-Braised Chicken with Fennel and Endive
Serves 4

2 pounds skinless/boneless chicken thighs
2 Tbls butter 
1 Tbls canola oil
2 medium fennel bulbs
4 heads belgian endive
1 large shallot
4 small carrots (optional)
1/2 cup white wine
1/2 cup chicken broth
1/2 cup heavy cream
1/4 cup Italian parsley
salt & pepper to taste


Sprinkle chicken with 1 tsp. each salt and pepper. In a dutch oven over medium-high heat, melt 1 Tbsp butter with the oil. Add chicken in a single layer and cook, without moving, until browned underneath, about 5 minutes. Turn over and cook until second side is lightly browned, about 2 minutes. Transfer chicken to a plate, drain fat from pan. (This is where I wish I would have browned the veggies up a bit but it did not even occur to me.)

While the chicken is browning, trim fennel bulbs (reserve 1/4 cup fronds) and cut bulbs into quarters, core and thinly slice. Trim ends of endive and quarter heads length­wise. Chop shallot. chop carrots into bite sized chunks.

Return pan to medium-high heat. Add wine and broth and stir, scraping bottom, to release browned bits from pan. 

Reduce heat to a simmer.  Add chicken, fennel, endive, shallot, carrots and re­­maining butter. Cover and let simmer, stirring occasionally, until chicken is cooked through, about 10-15 minutes.

Add cream to pan, increase heat to high, and cook uncovered, stirring, until slightly thickened, about 5 minutes. Season with salt and pepper. Spoon into a shallow bowl and sprinkle with parsley and reserved fennel fronds.

2014-12-09 Quick Braised Chicken 008

October 22, 2014

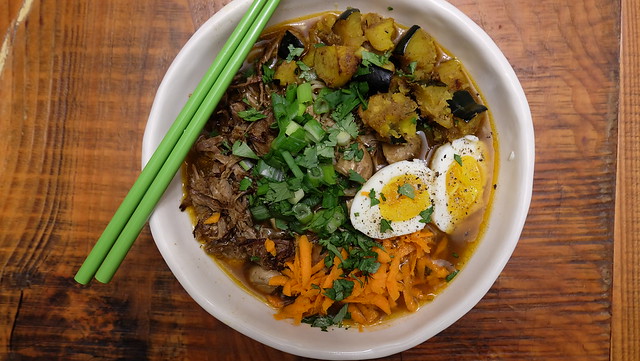
Crockpot Crispy Caramelized Pork Ramen with Roasted Acorn Squash

Yes the name is quite a mouthful.  However this recipe, oh this recipe.  It was definitely one of my favorite meals I've ever made.  To quote DP, my eyes while eating it looked like "Call of the Wild meets Top Chef".  It left me kind of speechless.  I think I was actually dancing with anticipation while caramelizing the pork, because I mean, is there anything better than pork that's been caramelized in sesame oil and a sprinkle of brown sugar after slow cooking it all day long?  I'm beginning to think not.  We made a couple of small edits to make the recipe gluten free but we mostly stuck to the script.  I found this to be just a tad salty for my palette so next time I might ease up on the soy sauce element but I'm very sensitive to salt.  DP thought it was perfectly salty.

The recipe itself is not hard at all but I would say it's a little involved.  For a leisurely Sunday though I didn't mind sporadically tending to it throughout the day, step by step.  Since most of the cooking time happens in the crock pot you could pull this off on a weeknight if you planned well.  Whatever the case may be I highly encourage you to make this ramen.  It is, by far, the tastiest version I've had outside of the real deal.  Enjoy! (and maybe invite me over when you make it)


Crockpot Crispy Caramelized Pork Ramen with Roasted Acorn Squash
modified ever so slightly from Half Baked Harvest

Soup
  • 3 lbs of pork butt (shoulder)
  • 4 cups low sodium chicken broth
  • 1/2 cup + 2 tblsp of low sodium soy sauce (Bragg's if you're gf)
  • 1/4 cup + 2 tblsp of rice vinegar
  • 1/4 cup fish sauce
  • 2 tblsp of red curry paste
  • 1 tblsp of fresh ginger, minced
  • 1 tblsp of sambal oelek (chili paste)
  • juice of 1 lime
  • 1 tblsp chinese five spice
  • 1 tsp black pepper
  • 2 tblsp sesame oil
  • 1/4 cup + 1 tblsp of brown sugar
  • 2 cups shiitake mushrooms, left whole
  • 4 packs ramen noodles (we used gf ones and they were great)
  • 4 soft boiled eggs for serving - I used this method
  • chopped carrots, cilantro, jalapeno + green onions for servings
Curry Roasted Acorn Squash
  • 1 medium acorn squash, seeded and diced
  • 2 tblsp coconut oil, melted
  • 1 tblsp curry powder (we used garam masala)
  • 1 tblsp white miso paste
  • 1 tblsp brown sugar
  • fresh ground pepper, to taste
  1. Add the pork to the bowl of the crockpot.  Pour the chicken broth, 1/2 cup of soy sauce, 1/4 cup of rice vinegar, fish sauce, red curry paste,  ginger, sambal oelek, lime juice, five spice, pepper, and 1 tblsp brown sugar into the pot.  Flip the pork around so it's all evenly coated and mixed together.  Cover and cook over low for 7 hours.
  2. About 40 minutes before the pork is set to be done preheat oven to 400 degrees.
  3. In a small bowl mix together the coconut oil, curry powder, miso, brown sugar, and pepper for the squash.  Add the diced squash and mix to evenly coat.  Bake for 30-40 minutes until soft, tossing a few times so the sides of the squash get a little crispy.
  4. Remove the pork from the crock pot once it's done and place in a bowl to shred with two forks or your hands.  Add mushrooms to broth in crock pot and cover again.
  5. Heat a large skillet or wok over medium high heat.  Add 1 tblsp sesame oil and once hot add about half of the pork.  While cooking sprinkle brown sugar over pork and 1 tblsp of soy sauce and rice vinegar.  Let the pork caramelize for 3-5 minutes stirring only once or twice.  Repeat process with remaining half of pork.  Keep the pork warm - I used the residual heat from roasting the squash to keep mine in the oven.
  6. Add the ramen noodles to the crock pot, cover and cook until soft.  At this point start your soft boiled eggs.  After noodles are soft, add half the pork to the crock pot.  Ladle soup into bowls and garnish with extra pork, carrots, green onions, cilantro, jalapeno, and boiled eggs.  Try not to let your jaw drop with amazement!
 DSCF3731

March 27, 2014

Thai Curry Vegetable Pot Pie

I struggled with whether or not to make this recipe.  It sounded so good but the recipe was written a tad poorly and I wondered if it would end up soupy.  In the end I decided that it's the thought that counts and I made quite a few adjustments to make it my own masterpiece.  Not to mention that I'll take just about any chance to roll out a piece of pie dough.  It's so therapeutic and rewarding when it comes together and I always get a thrill when I get it right.  It's easy for this one to get her kicks these days, mmkay?

Also this is a great recipe to make in this weird in between spring time because it's lighter than your traditional pot pie but still is hearty enough to chase away the rainy blues.  I made some changes not only to the vegetables I put in to the mix but also I always opt to make my own crust even though I know it's so much easier to use store bought.  But if you're not feeling it and don't get your kicks the same way I get mine then use that pre-made pie dough! If you do, this recipe is easy as pie.....pot pie.

Also if you aren't into the tofu thing, which I know lots who aren't, chicken would be a perfect meat to substitute in place of that.  After all chicken and pot pie go together like birds of a feather.  Below is the recipe as I made it. 

Thai Curry Vegetable Pot Pie
adapted from here

2 sheets of pre-made whole wheat pie crust (or here is the homemade recipe I use)
12 oz. drained extra firm tofu
2 tbl olive oil
1 yellow onion, diced
2 celery stalks, diced
2 carrots, diced
1 bunch kale, center stems removed and chopped thin
1 small head broccoli, stem removed and chopped into small pieces
3 cloves garlic, minced
1 sweet potato, diced
1 cup fresh or frozen peas
2 tbl soy sauce 
1/2 cup broth of your choice
1/2 can lite coconut milk
2 tsp green curry paste
1 tsp flour
2 tsp fresh herbs of your choice (I used thyme and parsley)
salt and pepper to taste

  1. First prepare your pie dough.  If you're making homemade get that prepared and chilling in the fridge.  If using premade there's usually a thaw period to abide by.
  2. Drain tofu by sandwiching between two plates and put a weight on top for about 10-15 minutes or until most of the liquid has drained out.  Then cut into 1 inch pieces.
  3. Preheat oven to 400 degrees
  4. Heat 1 tablespoon of olive oil in a large wok or skillet. Throw in tofu and cook until golden brown on all sides.  Remove from pan into a large mixing bowl and set aside.
  5. Heat 1 tablespoon of olive oil in same skillet or wok.  Add onion and garlic and saute until translucent.  Add celery, broccoli, carrots and sweet potatoes.  Saute until potatoes are tender.
  6. Add soy sauce and mix with veggies.  Remove veggies and put into the same mixing bowl with tofu.
  7. In the same wok or skillet add green curry paste and allow to heat until aromatic.  Add coconut milk and broth.  Then add the flour and allow to thicken on low heat for about 5 minutes.  Turn off heat.
  8. Prepare your baking pan with the pie dough.  If using pre-made use a 9" pie plate.  I used a larger casserole dish for mine as my homemade recipe made enough dough.
  9. Line the bottom of the pie dough with chopped kale.  Pour the tofu and veggies on top of the kale.  Then add the curry sauce from the pan on top of the veggies.
  10. Place the second pie dough over the top and seal the sides up as decoratively as you please.  Put a few vents by poking fork holes or something decorative as well.
  11. Bake in the oven for 25-30 minutes.  Let sit 5 minutes before serving.  Goes great with a green salad!


March 18, 2014

Rigatoni with Vegetable Bolognese

I should have posted this last week before I went on vacation, but I was so excited and trying to get as much done at work as possible before I left that it sort of slipped my mind. Likewise, I forgot to take an actual photo of anything, because I was too anxious to eat, and all I have to show for this feast is a Vine video and the oohs and aahs of the friends who ate it.

This is one of my favorite pasta dishes to make because it is hearty and rich and feels like a special treat, but it has no meat and makes me feel a little better about myself when I eat seconds.  Next time I am going to toss in some kale or chard at the end to really amp up the veg factor. 

This recipe comes from Giada De Laurentiis, who I love, and her cookbook was the first I bought, a very long time ago when I barely had any interest in cooking. She makes things look so simple and delicious, she convinced me that I could do it!  This is definitely not the first recipe I have made from Giada, and it won't be the last, but so far, it is my favorite and the one I have made the most frequently.  You could just as easily have this sauce with polenta or some other type of noodle, or use it in a lasagna or any way you would use a regular meat bolognese! 

One note:  definitely do not skip the dried mushrooms, and get the best ones you can find. These mushrooms really amp up the flavor and add a richness to the sauce that is missing if you don't use the dried mushrooms plus their liquid.

Vegetable Bolognese
Slightly adapted from Giada De Laurentiis

1-ounce dried porcini mushrooms
1 1/2 cups hot water
3 carrots, peeled and diced 
1 onion, peeled and diced 
1 red bell pepper, seeded and diced
4 garlic cloves
1/4 cup olive oil
2 teaspoons chopped fresh thyme leaves
1 teaspoon chopped fresh oregano leaves 

1 teaspoon red pepper flakes (optional)
2 teaspoons salt
1 teaspoon freshly ground black pepper
8 ounces assorted mushrooms (like shiitake, cremini, and brown), stemmed and chopped
2 tablespoons tomato paste
1/2 cup red wine
1/2 cup mascarpone cheese
1 pound rigatoni pasta
1/4 cup Parmesan


Place the dried mushrooms in a small bowl and cover with 1 1/2 cups very hot water. Set aside and let the mushrooms soften.
Remove the thyme and oregano from their stems, chop them up a bit, and set them aside.

Dice the carrots, onion, bell pepper, and garlic to a fairly small consistency. You want them to be a little chunky but not a regular dice. I think of it as small dice.  Alternately, you can chop them up with a food processor. Pulse the vegetables until finely chopped but still chunky.

Place the olive oil in a large, heavy skillet over medium-high heat. Add the chopped vegetables, thyme, oregano, red pepper flakes (if using), salt, and pepper and cook until tender, about 6 - 10 minutes.

While the vegetables are cooking, destem and chop your mushrooms into small chunks. 

Strain the porcini mushrooms, reserving the porcini mushroom liquid. Chop the now softened porcini mushrooms to small chunks.

Add the porcini mushrooms, fresh diced mushrooms, and tomato paste to the pot and continue cooking, stirring to dissolve the tomato paste, until the mushrooms are softened, about 8 minutes.

Add the porcini mushroom liquid and red wine. Bring the liquid to a boil, reduce the heat to low, and let the mixture simmer until the liquid is reduced by half, about 15 minutes.

While the mushrooms are cooking away, boil a pot of water for the pasta.  Cook the pasta until tender but still firm to the bite, stirring occasionally, about 8 to 10 minutes. Drain pasta, reserving 1/2 cup of the cooking liquid.

Once the liquid in the vegetable mixture has reduced by half and is looking and s melling extra delicious, add the mascarpone cheese and stir until the cheese is incorporated.  This adds a really amazing creaminess that makes this sauce feel so decadent!

If the sauce seems to thick, add a bit of the pasta liquid to thin it out a bit. I did not do this, as I like a thicker sauce.

Toss the pasta with the sauce, top with parmesan and serve!


Watch: