Showing posts with label holiday. Show all posts

December 30, 2014

Sweet and Sour Beef Brisket - 100th Post!

Happy 100th post to us!  We've been through our ups and downs with this blog over the years but Mostly Soup is still kicking.  Thanks to all those who read our stuff.  We like keeping this blog up for a reference journal of our own accord and those who follow along are icing on the cake.  So raise a glass to you - THANK YOU!

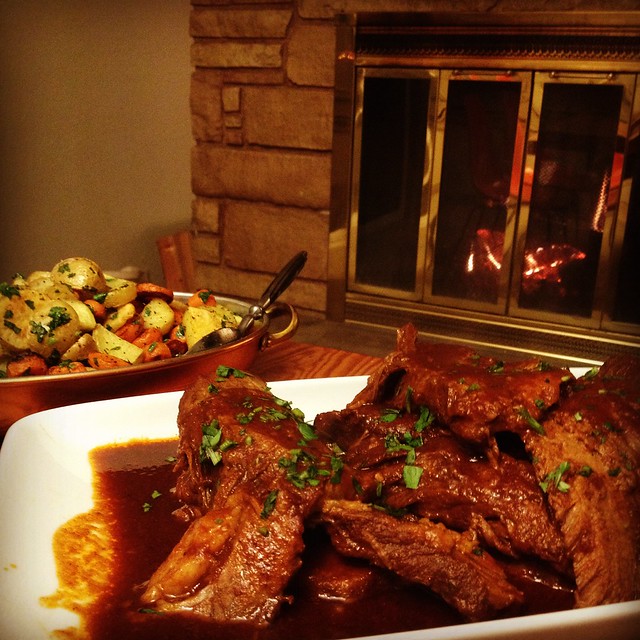
I made this classic beef brisket when the rain first started in and paired with some red wine and a warm fire it was just the trick for coziness.  It would be the perfect dish to make for a stay at home New Years Eve celebration.  It feels decadent and rich but is really hands off and easy.  I didn't feel the need to make any sort of adjustments to this recipe; it was great just the way it is.  Just a heads up that you do need to start this recipe the night before you plan to serve it, or in the morning time so you have the whole day to rest it.

I roasted up some carrot and potato "coins" to go along with it.  If you have the Smitten Kitchen cookbook this recipe is in there but it's as easy as cutting up the potatoes and carrots in coin shapes and roasting until done with your favorite seasonings.

In any case I hope you get to try this out before winter is over.  Have a very happy New Years (with or without this brisket)!!

Sweet and Sour Beef Brisket
not adapted at all from Smitten Kitchen cookbook

•  4-to-5-pound (1¾ to 2¼ kg) piece beef brisket
•  1½ teaspoons kosher salt, plus more for initial seasoning of meat
•  Freshly ground black pepper
•  1 cup (235ml) beef stock
•  3 tablespoons (50 grams) tomato paste
• 1/4 cup (50 grams) brown sugar, light or dark
•  4 teaspoons paprika
•  2 teaspoons Worcestershire sauce
•  1/8 teaspoon red chili flakes
•  1 teaspoon garlic powder
•  2 tablespoons (15 grams) onion powder

Season the meat generously on both sides with salt and pepper.  Whisk all of the remaining ingredients together in a bowl.  Preheat your oven to 350 degrees.  Place the meat in a dutch oven (or any other sturdy pot with a lid) and pour the sauce over it.  Put the lid on and roast for 3 hours, or tender enough to pull apart with a fork.

Chill the entire dish in the fridge for several hours or up to one day.  This resting time will enhance the flavor and texture of the meat.  An hour before you are ready to serve it heat the oven to 300 degrees and remove the dish from the fridge.  Skim off any fat that has congealed at the top of the meat.  You can leave some if you like but I skimmed it all for a less oily finish.  Remove the meat and slice into 1/4-1/2 inch slices and put back into the sauce in the pan.  Replace the lid and put into the pre-heated oven.  Reheat until the sauce is bubbly around the edges.  Serve immediately with sauce on the side to pour or spoon over meat.
2014-11-10 19.45.59-1

October 13, 2014

Applesauce Cake with Caramel Glaze

I'm going to go ahead and say that this is the best dessert I've eaten in a long time, let alone made.  It was seriously good.  This might have something to do with my palate craving fall flavors and this being one of the first fall items I've made this year.  But I also have some serious back up in thinking this cake is the jam.

It also was insanely easy to make.  I made it a little harder by making my own applesauce from scratch, which is not a requirement, but probably made this cake that much better.  Plus making your own applesauce may seem like it's a crazy thing to do when store bought is pretty legit but honestly it's so easy and the fall bounty of apples is upon us.  I got mine at $1/lb at my local farm stand and I've seen grocery store prices hover not too much higher than that.

I have to say that for such an easy cake to make, it's pretty impressive looking and tasting.  So if you have some folks you'd like to impress or a loved one then whip this up and let them think you slaved away.  Happy fall everyone!

Applesauce Cake with Caramel Glaze
made from Food52; applesauce recipe was made up on the fly

Cake:

  •     2 cups all-purpose flour
  •     1 1/2 teaspoons baking soda
  •     1 teaspoon kosher salt
  •     1/4 teaspoon finely ground black pepper
  •     2 teaspoons cinnamon
  •     1 teaspoon ground ginger
  •     1/4 teaspoon ground allspice
  •     2 large eggs
  •     1 cup sugar
  •     1/2 cup light brown sugar
  •     1 1/2 cups unsweetened (preferably homemade) applesauce
  •     2/3 cup vegetable oil
  •     1 teaspoon vanilla

Caramel Glaze:
  •  4 tablespoons butter, cut into chunks
  • 1/2 cup packed light brown sugar    
  • 1/3 cup heavy cream
  • 1/4 teaspoon kosher salt
  • 3/4 to 1 cup sifted confectioners’ sugar
Applesauce:
  • 6 lbs of apples.  I used gala but feel free to use a mix of sweet/tart apples
  • juice of one lemon
  • 1 cup apple juice or cider
  1. If making the homemade applesauce, start with that recipe.  Core apples and cut into medium size chunks.  Add to a large dutch oven or stock pot.  Add lemon juice and apple juice.  Bring to a boil and then let simmer until apples are broken down and soft, about 25 minutes.  Using a hand blender or regular blender, blend the mixture until smooth.  Jar up anything you don't use in the cake recipe.  Feel free to add spices or sugar at this point but you don't need that for the sauce you use in the cake.
  2. Heat oven to 350 degrees and butter/flour a bundt pan.  Sift together flour, baking soda, salt, pepper and spices and set aside.  In large mixing bowl of a stand mixer beat the eggs with both sugars until a light color. Mix in the applesauce, oil and vanilla until smooth.
  3. Using a spatula fold in the dry ingredients - don't over mix.  Pour the batter into the prepared bundt pan and bake for about 45 minutes or until cake tester comes out clean.  Cool the cake in the pan for about 10 minutes before turning it out on a rack to cool completely.  Make sure the cake is cold before glazing.  
  4. Put the butter in a medium saucepan with brown sugar, cream and salt and set over medium heat. Bring to a full rolling boil while stirring constantly.  Boil for one minute exactly then pull off the heat.  Leave the pan to cool for a few minutes.  Then gradually whisk in powdered sugar until you have a thick but pourable consistency.  You might not use all the sugar.  If it becomes too thick then add a splash of cream to thin it out again.  Immediately pour over the cooled cake.  Let the glaze set for a few minutes, or longer, before serving the cake.
IMG_2325[1]


April 25, 2014

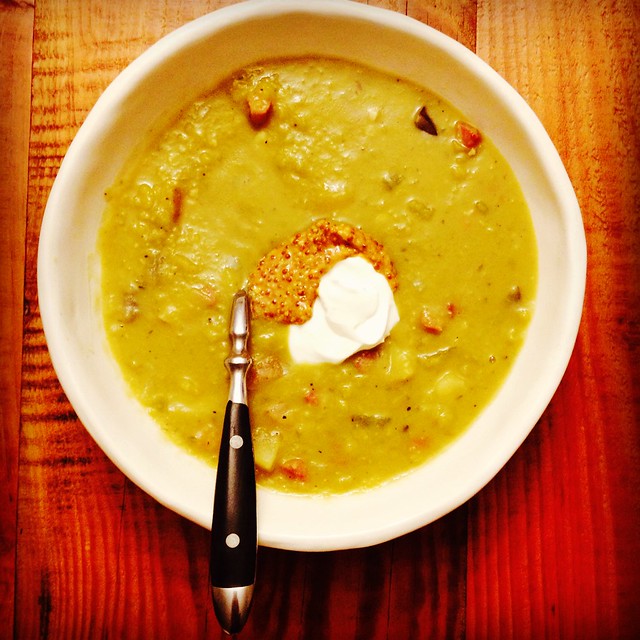
Ham Bone Split Pea Soup

Ham bone sure is fun to say isn't it? Let's see how many times I can sneak it into this post. Like many a family we made a giant ham for Easter.  This was of course after my brother told me he was bringing ham to Easter brunch and yet I still felt the need to purchase a 9 pound monstrosity.  I think I have that Girard gene for sure - no matter how much food people are bringing it's never enough - must. buy. more.  Maybe it's more like a disease. 

This subject matter is not a new one for this blog, see here.  However this version is more a rich man's version.  It's got the luxurious addition of chunks of ham and the bone as well as some fancy tri color potatoes and leeks.  Usually I'm leery of recipes that say to add water instead of broth and I end up subbing broth in every time.  But this one I trusted to be flavorful at the end because of the bone cooking right in the soup for almost 2 hours.  It didn't disappoint, I really loved this soup and am coming to realize that I like these creamy/chunky versions of soup the most.  If you saved your ham bone from Easter or come across one in the near future you should definitely make this soup or at the very least ham stock because the ham bone is prolific my friend.

Split Pea Soup
adapted from Bon Appetit

  • 2 tablespoons olive oil
  • 1 medium onion, chopped
  • 2 medium leeks, white and pale green parts only, chopped
  • 2 celery stalks, chopped
  • 4 garlic cloves, minced
  • kosher salt and black pepper
  • 1 lb tri-color potatoes (or yukon gold), diced
  • 1 cup leftover ham, diced
  • 1 ham bone
  • 6 sprigs thyme
  • 2 bay leaves
  • 2 cups split green peas
  • 2 tablespoons Worcestershire sauce
  • Sour cream and whole grain mustard for garnish, optional

Heat oil in large stock pot or dutch oven over medium heat. Add onion, leeks, celery and garlic; season with salt and pepper and cook until vegetables are soft, stirring occasionally.  Add potatoes and ham.  Cook, stirring occasionally until potatoes are soft.  Add ham bone, thyme sprigs, bay leaves, and split peas.  Add enough water to cover all ingredients.  Bring to a boil, reduce heat, then simmer until split peas are very soft and falling apart, about 1.5 hours.

Remove ham bone,thyme sprigs, and bay leaves.  Add Worcestershire sauce and season with any additional salt and pepper needed.  Serve with sour cream and mustard, if desired.

(ham bone count = 9)


2014-04-24 20.43.55-1


April 5, 2011

Lemon Rolls with Cream Cheese Lemon Thyme Glaze

There were a million things pointing me towards making these sweet wonderful rolls. First off, I planted my first herb garden this last weekend! I'm pretty excited about it and I keep smiling every time I walk into my kitchen and see a window sill of fresh herbs smiling back at me. I've managed to use them in just about everything I've made since then but the one that has by far stolen me away is the lemon thyme. Just rubbing your fingers on it leaves the beautiful refreshing smell of lemon on them. It doesn't get much better than that. Secondly, I ran across a recipe for these lemon rolls on The Kitchn that I remembered I had bookmarked some time ago so I stocked up on lemons at the grocery store the very same day.

Those lemons came in handy later that day when I started feeling sick. I must've had about 15 lemon, hot water and honey drinks over the next 24 hours trying to chase the bug away. But alas, I'm home sick today with nothing to do but bake to make me feel better. I realized while making these that yellow is one of my favorite colors and I sure do have a lot of it in my kitchen decor. It's a brighten your day kind of color. The next thing you know I'm stumbling across this post on Poppytalk alerting me that today was in fact declared a day of yellow for Spring Colors Week. Sometimes when you get a good idea it doesn't take a lot of convincing to carry it through but it sure does help when the universe is there to back you up. So, here's my own little tribute to yellow.

I made the recipe as it was posted but I added some fresh lemon thyme to the cream cheese glaze. I also modified the lemon amounts a bit as I think my glaze and filling were a bit too wet and it needed to be adjusted into measurements instead of just whole lemons.

Sticky Lemon Rolls with Lemon Cream Cheese Glaze
Makes 12 large breakfast rolls

Lemon Roll Dough
1 envelope (0.25 ounces, or 2 1/2 teaspoons) active yeast

3/4 cup milk, warmed to about 100°F (warm but not hot on your wrist)
1/2 cup (1 stick) unsalted butter, very soft
1/4 cup white sugar
2 teaspoons vanilla extract
4 1/2 cups flour
1/2 teaspoon salt
1/2 teaspoon nutmeg
2 eggs
2 tablespoons of grated lemon zest
(about 1 lemon)

Sticky Lemon Filling
1 cup sugar
1/4 teaspoon freshly-ground nutmeg
1/2 teaspoon powdered ginger
3 tablespoons unsalted butter, very soft
1/4 cup fresh lemon juice
2 tablespoons grated lemon zest (about 1 lemon)

Lemon Cream Cheese Glaze
4 ounces cream cheese, softened
1 cup powdered sugar
1/2 cup fresh lemon juice
2 tablespoons fresh lemon thyme
2 tablespoons grated lemon zest for garnish
(about 1 lemon)

Make the dough:
Zest and juice the lemons. Divide the zest into three parts. Divide the juice into two parts, and set aside.

In the bowl of a stand mixer sprinkle the yeast over the warmed milk and let it sit for a few minutes. With the mixer paddle, stir in the softened butter, sugar, vanilla, and one cup of the flour. Stir in the salt, nutmeg, and one part (1/3) of the lemon zest. Stir in the eggs and enough of the remaining flour to make a soft yet sticky dough.

Switch to the dough hook and knead for about 5 minutes, or until the dough is elastic and pliable. (If you do not have a stand mixer, stir together the ingredients by hand, then turn the soft dough out onto a lightly floured countertop. Knead the dough by hand for 5 to 7 minutes, or until the dough is smooth, pliable, and stretchy.)

Spray the top of the dough with vegetable oil, and turn the dough over so it is coated in oil. Cover the bowl with plastic wrap and a towel and let the dough rise until nearly doubled — about an hour.

Make the filling:
In a small bowl, mix the sugar with the nutmeg and ginger, then work in the second part of the lemon zest (1/3) with the tips of your fingers until the sugar resembles soft sand. Slowly pour in one part of the lemon juice, stirring. Stop when the sugar and lemon juice form a wet, clumpy mixture. (You may use all of the reserved half of the lemon juice; you may stop before completely adding that half of the lemon juice.)

Assemble the rolls:
Lightly grease a 13x9 inch baking dish with baking spray or butter. On a floured surface pat the dough out into a large yet still thick rectangle — about 10x15 inches.

Spread the dough evenly with the 3 tablespoons of softened butter, then pour and spread the lemon-sugar mixture over top. Roll the dough up tightly, starting from the top long end. Stretch and pull the dough taut as you roll, to keep the lemon sugar firm inside. Cut the long dough roll into 12 even rolls. Pinch the bottom of each roll closed and place each one, open and cut side up, in the prepared baking dish.

Cover the rolls with a towel and let them rise for an hour or until puffy and nearly doubled. (You can also refrigerate the rolls at this point. Cover the pan tightly with plastic wrap, and place it in the refrigerator for up to 24 hours. When you are ready to bake the rolls, remove the pan from the fridge, and let them rise for an hour.)

Heat the oven to 350°F. Place the risen rolls in the oven and bake for 35 minutes or until a thermometer inserted into a center roll reads 190°F.

Make the glaze:
While the rolls are baking, prepare the glaze. In a small food processor (or with a mixer, or a sturdy whisk), whip the cream cheese and the lemon thyme until light and fluffy. Add the remaining lemon juice and blend until well combined. Add the powdered sugar and blend until smooth and creamy.

Finish the rolls:
When the rolls are done, smear them with the cream cheese glaze, and sprinkle the final remaining lemon zest over top to garnish. Let cool for at least 10 minutes before serving, but do serve while still warm.

lemonthymeplant
My Inspiration


lemons!gratedlemon
A little before and after

teatowel
My pretty tea towel with the dough rising

buns
Makes my mouth water just looking at 'em

onebundone
Another before and after

March 9, 2011

Labor of Love-Macaron Making

This past Valentine's day I took as an excuse to tackle a long time goal of mine-french macaron making. Michelle got me a detailed book on the subject for my birthday last year that I've been studying intently for the last 6 months. I invested in all the necessary equipment and we also got to use my new Kitchenaid mixer for the first time. A day of firsts indeed. Michelle came over to lend a hand in the kitchen and also for all the adorable crafting we did for our Valentine's gifts that we passed out to our loved ones. This was an all day project, with a couple of fails and do-overs, luckily we were smart enough to fit in pedicures and champagne drinking.

These little cookie monsters are hard to make but I think we had success in the end. They turned out really well, as did the darling packaging we made. We ended up making two different kinds of macarons. The first was a fig cookie with orange liqueur buttercream filling. The second was a pink colored cookie with fresh strawberry buttercream and a sprinkle of Dagoba's spicy chocolate powder on top. We did half of the strawberry batch with coconut on top but unfortunately those didn't turn out because we didn't cook them long enough. In the end we impressed ourselves with pulling off this baking feat. It left me wanting to experiment even more with the french macaron! Here is the detailed process of this labor of love.

Fig Macarons with Orange Liqueur Buttercream or
Pink Macarons with Fresh Strawberry Buttercream and Spicy Cocoa Topping

Macaron batter:
2/3 cup (3 ounces/85 grams) ground almonds
1 1/2 cups (5.25 ounces/150 grams) powdered sugar
3 large egg whites, at room temperature
5 tablespoons/65 grams granulated sugar
1 teaspoon vanilla extract, or seeds from 1/2 vanilla bean
Additions:
2 tablespoons ground dried figs or
red food coloring

Orange Liqueur Buttercream or Fresh Strawberry Buttercream:
7 tablespoons (3.5 ounces/100 grams) unsalted butter, softened
3 tablespoons (1.4 ounces/40 milliliters) water
3 tablespoons (1.4 ounces/40 grams) granulated sugar
1 egg
vanilla extract
Additions:
2 tablespoons orange liqueur, such as Cointreau or
4 tablespoons fresh strawberry puree

Toppings:
shredded unsweetened coconut or
Dagoba's spicy cocoa powder

To make macaron batter:
Cut a sheet of parchment paper (or silpat) to fit your baking sheet. Draw 1 inch circles on paper, spacing them at least 1/2 inch apart. This patter will be your guide for squeezing out the macaron batter. In a food processor, grind almonds and powdered sugar together to a fine powder. Sift the mixture through a medium-mesh sieve twice. Set aside.

In a stainless steel mixing bowl, beat egg whites (in a stand mixer or with a hand mixer) on high speed until they are foamy. Gradually add the granulated sugar to the egg whites. Add vanilla and continue to beat the meringue until it is stiff, firm, and has a glossy texture. Make sure this is VERY stiff. Just when you think it's stiff enough, beat a little more. This part is crucial to not ending up with runny macaron circles (we found out later).

Add half of the sifted flour mixture and stir with a spatula while scooping it up from the bottom of the bowl. Add the rest of the flour and mix it lightly in a circular motion. At this point add any flavors, such as the fig bits, or coloring you desire. Feel free to experiment with a variety of dried fruits or coloring, we did! After you run out of flour or have added your flavoring, press and spread out the batter against the bowl's sides. Scoop the batter from the bottom and turn it upside down. This is called making the macaronnage. Repeat this process about 15 times but not more than 20. When the batter becomes nicely firm and drips slowly as you scoop it with a spatula, the mixture is done. This is called the macaronner.. Attach a 0.4 inch tip to a pastry bag. Twist the bag to hold the tip tightly. This prevents the batter from leaking out. Place the pastry bag, tip down, inside a deep measuring cup and pour the macaronner batter into it. After pouring the batter into the bag. clip the bag top to prevent the batter from coming out. You can also use a rubber band. Using the parchment outlined in circles, squeeze small circles of batter onto a cookie sheet, making sure that the batter is firm and does not run. At this point sprinkle any coconut or cocoa or other powdered toppings you may want onto the circles.

Rap the baking sheet firmly against the counter or other flat surface. This helps the macarons hold their rounded shape and helps the pied, or "little foot", to form. Dry the batter at room temperature, uncovered, for 15 minutes. A slight crust should form on top of the macarons. On rainy days, it helps to dehumidify the room. If the batter circles do not stick to your finger when you touch them, the drying process is complete. On a dry and sunny day, the drying process takes approximately 30 minutes.

After the macarons have sufficiently dried you are ready to bake them. Place the oven racks in the center of the oven. Preheat to 375 degrees. Stack the baking sheet with the batter circles into an empty baking sheet and slide both into the oven. Bake for 15 to 18 minutes until slightly crisp and crackled on top. If the insides of the macarons are still soft after 15 minutes lower the oven temperature to 300 degrees, cover the tray with foil, and bake for another 2 to 3 minutes. Remove the baking sheet from the oven and cool on a wire rack. When the macarons are completely cooled, remove them from the baking sheet.

To make buttercream:
Cut butter into small pieces and put in a medium bowl. Stir the butter with a spatula until it becomes smooth and creamy like mayonnaise, set aside. Put water and granulated sugar in a small saucepan and stir well. Heat the mixture over medium low heat until the sugar is completely dissolved and the mixture begins to become syrupy. Scoop some syrup with a spoon and drop it into a small amount of water. Then try to scoop the syrup out of the water and make a ball with it using your fingers. If you can do this, the syrup is the right density. While heating the syrup, break an egg into a bowl and beat it lightly with a hand mixer. Pour the syrup like a thread into the bowl and beat it at high speed. Reduce the speed to medium and then to slow, and continue beating until the bottom of the bowl is no longer hot and the mixture becomes white and heavy.

Add the creamed butter in 3 batches into the syrup beating with the hand mixture each time you add it. When the mixture is well mixed the process is done. Stir a drop or two of vanilla extract and whatever flavoring you are adding. When the mixture is well stirred it is done. Spread the cream between the macaron puffs and sandwich together. Now they are ready to eat!

2011-02-13 cookies 003
Not runny, very important
2011-02-13 cookies 022
A sprinkle of cocoa
2011-02-13 cookies 025
Little feet
2011-02-13 cookies 039
Getting creamed
2011-02-13 cookies 0352011-02-13 cookies 045
Stuffed!
2011-02-13 cookies 053
Valentines presents ready to go
2011-02-13 cookies 060
Just a peek at the goods


January 4, 2011

Angel Biscuits

Growing up I remember my grandmother making homemade biscuits as any fine grandmother does, more specifically my grandmother made Angel Biscuits. I'm not sure what exactly is angelic about them, I'm guessing it's a reference to being light as air, but what I do remember is helping her cut the biscuits and always hoping there would be raw dough scraps leftover. My grandmother would hand them to me and I would chomp on the yeasty sweet dough. It's one of my favorite childhood memories. When I was in my early 20s I began collecting all of these family recipes in a small notebook so I could use them for years to come. Somewhere along the way, between many moves, I lost the recipe book and hadn't seen it in years.

I'd pretty much written the book off until I was home for Christmas this year and my aunt walks up to me and asks, "Recognize this?" and holds up my long lost collection of recipes. I squealed with excitement and realized that they were actually using the book for a couple of recipes for Christmas dinner that evening. So after thinking it was long gone I had such a good time browsing through the book and got really excited for being able to recreate these recipes again. The first thing I made when I got home was Angel Biscuits. And fortunately for me, I was the only one around to eat all of the leftover dough scraps. These biscuits are slightly sweet and can be served with jam but they also work well as a dinner roll. I hope you enjoy them as much as I have (and will)!

Angel Biscuits
original source unknown

1 package active dry yeast
2 tablespoons warm water
5 cups self rising flour (or make your own by adding 1 tsp baking powder for every 1 cup of all purpose)
1/4 cup sugar
1/2 teaspoon baking soda
1 cup shortening
2 cups buttermilk
melted butter for pans and tops of biscuits

Preheat oven to 400 degrees. Grease two 13x9 inch pans with melted butter. Dissolve yeast in warm water and set aside to activate. Meanwhile, stir flour, sugar, and baking soda (and baking powder if using) together. Cut in shortening until mixture is pea sized consistency. Mix buttermilk with yeast and add to flour mixture. Stir until just combined. Roll the dough out onto well floured surface until 1/2 inch thick. Cut with 2 inch biscuit cutter or a pint glass works just as well. Place close together in buttered pans. Allow to rise one hour. Bake for 15-20 minutes until lightly brown. Brush tops with melted butter.

DSC01499DSC01509
Cutting the shapes and my dough scraps

DSC01512DSC01521
Rising and fully baked

DSC01527
with some apricot jam

November 9, 2010

Cranberry Apple Butter

I remember my grandmother making apple butter year after year when I was a kid, always thinking it tasted nothing like butter (and a tad disappointed with that fact). I'm not sure how she was making hers but I remember thinking how insanely talented my grandmother was. If only I knew how easy she was getting off. This is one of the easiest recipes you'll ever make. I guarantee it. That fact is largely due to using a crock pot and an immersion blender but you can still make this recipe even if you don't have those tools.

This recipe was very good. I would've preferred it a little bit thicker, however, I loved how the tartness of the cranberry played off the sweetness of the apple. This recipe made quite a bit of apple butter so this would be a perfect gift to jar up and hand out for the holidays. Impress your friends with your grandma-like skills. We ate this on pumpkin bread and regular toast for breakfast for weeks. Enjoy!

Slow Cooker Cran Apple Butter
source: Mommie Cooks

10-12 Apples, Chopped
3 Cups of Whole Cranberries
1/2 Cup of Brown Sugar
1/2 Cup of White Sugar
1 tsp of Cinnamon
1/2 tsp of Nutmeg
1/4 tsp Ginger
1/4 tsp Cloves
4 Shakes of Salt

Instructions

Throw it all in your slow cooker and cook it on low for 12 hours. You can also do this using a dutch oven in your regular oven at 400 degrees. Emulsify it smooth with an immersion blender or by batches in a regular blender.

DSC01131
All lined up ready to be chopped

DSC01137
The beginning

DSC01143
12 hours later

DSC01148
Pretty in jars

DSC01152
Even better on pumpkin bread

July 14, 2009

233rd Annual Dionysian Ritual of Opulence Over Open Flame

When DP announced that he would be hosting a BBQ for the 4th my mind immediately starting reeling with what food I was going to bring. I have this terrible problem of overcompensating with food when either invited to or hosting a gathering of any sort. What can I say, I like options. So I started off with about 10 ideas and ultimately narrowed it down to 3 dishes.

The first thing was pulled pork. I have always wanted to make this and being that it is mostly hands off I figured it'd be a great recipe to add to the mix. I don't have much experience with slow cookers but there's not a whole lot to it. I used a recipe from the blog Soup Belly. It was really simple but next time I'll probably make my own bbq sauce. Even though I used one I really like, Stubb's, I feel the recipe could've been a touch more homemade. I might try a dry rub beforehand as well. Also, at 10 hours my pork was falling apart and ready to shred. This may have been because I used a boneless pork shoulder. Overall the pork was well received and a cinch to make.

Pulled Pork in a Crock Pot (serves 10)
adapted from Soup Belly

4 lbs of pork shoulder (often called pork butt)
2 large yellow onions
1 cup ginger ale
18 oz. bottle of bbq sauce of choice (feel free to make your own here) plus more for dipping if so desired

Chop onions and scatter half on the bottom of crock pot. Lay pork shoulder on top. Cover with second onion and ginger ale. Cover with lid, turn crock pot on to low and let cook for 10 hours. This can take up to 12 hours but I think my crock pot cooks at a high temperature so be sure to check the pork as you near the end. When it falls apart to the touch, it's nice and ready.

Take pork out and place on a cutting board. Shred the pork using 2 forks. Discard the onions and pork juices and place shredded pork back in the pot. Cover with bbq sauce and cook on low for another 4-6 hours. Serve on buns or alone. Either way is delicious!

Alongside all that pork I couldn't resist making some baked beans. I used a recipe I found via Cooking Light. There was something that tasted off about this recipe to me but people seemed to like it at the party. I'm not sure i'll used it again, although I did like the heat that came from using the chipotle peppers.

Honey-Chipotle Baked Beans (serves 8-10)
from Cooking Light

Cooking spray
1/2 cup minced shallots (about 5 ounces)
1 tablespoon ground cumin
1 tablespoon minced garlic
1/2 cup tomato puree
1 tablespoon canola oil
1/4 cup honey
1/4 cup cider vinegar
2 tablespoons molasses
1 tablespoon Worcestershire sauce
1/4 teaspoon salt
2 chipotle chiles, canned in adobo sauce, seeded and chopped
2 (28-ounce) cans baked beans

Preheat oven to 300°.

Heat a large nonstick skillet over medium-high heat. Coat pan with cooking spray. Add shallots; sauté 4 minutes or until golden. Add cumin and garlic; sauté for 1 minute. Add tomato puree and oil, and cook for 2 minutes or until thick, stirring constantly. Add honey and the next 5 ingredients (through chiles). Reduce heat; simmer for 10 minutes, stirring occasionally.

Combine beans and shallot mixture in a 2-quart baking dish. Bake at 300° for 1 hour or until thick and bubbly.

And last, but certainly not least, was cherry pie! I found a recipe for "slab" cherry pie which is basically just pie in giant proportions. I figured that it'd be better for serving a crowd. I even invested in a jelly roll pan for this baby, oh and (!) a Cherry Chomper to do the dirty pitting work. I'm such a sucker for an excuse to buy new kitchen gadgets.

Cherry Slab Pie (serves 12)

taken from The Italian Dish

Slab Pie Dough (pâte brisée)

3 ¾ cups all purpose flour
2 ½ teaspoons coarse salt
1 ½ teaspoons sugar
3 sticks unsalted butter, cold, cut into pieces
½ cup ice water

Place the flour, salt and sugar in the bowl of a food processor and pulse to combine. Add the butter and pulse until the mixture resembles coarse crumbs, about 10 seconds.

With machine running, slowly pour the ice water through the feed tube until the dough just comes together in a ball.

Divide the dough into two pieces, one slightly larger than the other. Flatten a little, dust with flour and wrap the dough in plastic wrap and refrigerate at least one hour or overnight.

Pie Filling

2 ½ pounds (about 6 cups) fresh cherries, pitted, or 2 ¼ pounds (about 6 cups) of fresh blueberries
1 ¼ cups granulated sugar
¼ cup cornstarch
juice of ½ lemon
¼ teaspoon salt

Combine all ingredients in a large bowl, stir to combine, set aside.

Glaze:
2 tablespoons heavy cream
¼ cup sanding sugar or granulated sugar

To make the pie:

Preheat the oven to 375 degrees. On a lightly floured surface, roll out the larger piece of dough into a rectangle, a little bit larger than your baking sheet. The original recipe calls for a 15x10 baking sheet, but I used a 13x10 jelly roll pan. To make this easier, place a piece of plastic wrap on your working surface, dust with flour. Place pie dough on top, dust with flour and place another sheet of plastic wrap on top. When your dough is the right size, lay your rolling pin on top of the top sheet of plastic wrap. Start rolling the dough around the rolling pin, leaving the bottom sheet of plastic wrap on your working surface. Dust the dough around the rolling pin as you go, so it will not stick to itself. Lift rolling pin over your baking sheet on one end and unroll dough. Remove plastic wrap from top. Fit into your rimmed baking sheet, pressing into corners (pastry will hang over sides). Spread filling into pie shell.

On a lightly floured surface, roll out remaining piece of dough to the size of your pan. Using same method as above, drape dough over filling. Fold edge of bottom dough over top dough. Pinch edges to seal Prick the top dough all over with a fork. Brush the entire surface of the pie with the cream and sprinkle with the sugar.

Bake until crust is golden brown about 40 to 55 minutes. Transfer to a wire rack to cool just until the pie is still warm to the touch. Serve warm or a room temperature. Cut into 12 pieces. Slab pie can be kept at room temperature, loosely covered with plastic wrap, for up to 2 days.

And because this is already just too much information in one post I'm going to 80's montage the pictures again:

IMG_2031IMG_2038
IMG_2037IMG_2048

And I just realized I didn't take any pictures of the baked beans. 4th of July is ruined. 10 days after the fact.

April 16, 2009

Hippity Hop!

No soup in this post, but! Our lovely little home had been planning a big Easter Extravaganza for months. Well, since Easter last year, to be honest. Instead of dying eggs the old boring way with kits from the store, we decided to try this!

Here are the ties we used:

20090410_Easter_002 (1)

Here are our finished eggs:

20090412_Easter_013

They did not turn out as vibrant as we had hoped for, but they still look 1000 times better than if we had just done plain old regular egg dying! In addition to these eggs, we made a bunch of decorations such as bunny rabbits and flowers cut out of construction paper, and taped them up around the house. We also made (and ate!) a lot of fantastic food!

Michelle decided that she wanted to make Macaroni and Cheese from scratch. After looking at loads of recipes, the final recipe was modified from Food Network's Paula Deen.

Yummy and Easy Mac 'n' Cheese

4 cups macaroni
4 cups cheese, a mix, your choice of cheese. I used about:
1.5 cup grated Aged White Cheddar
1/2 cup grated Gruyere
1/2 cup grated Fontina
1 cup grated Smoked Gouda
1/3 cup grated Chipotle Cheddar
1/2 cup sour cream
6 tablespoons butter, cut into pieces
1 egg
1 teaspoon salt
1 teaspoon pepper
a few dashes of Nutmeg
a few dashes of Cayenne Pepper
1.5 cup milk
breadcrumbs (I used Panko)
Nonstick spray

Preheat oven to 350 degrees F. In a large pot, bring water to boil. Sprinkle a little salt and cook macaroni until al dente. Drain pasta and place in a large bowl and while pasta is still hot add all the cheese and fold it in. In a separate medium bowl, using a whisk, combine the sour cream, butter, eggs, salt, pepper, nutmeg, cayenne, and milk. When mixed, add to the macaroni
mixture. Spray casserole dish with nonstick and pour macaroni mixture into the dish. Bake for 30 minutes, sprinkle bread crumbs on, and bake for a few more minutes until it looks pretty crispy on top and bubbly around the edges. Top with additional cheese, if desired.

It was delicious and a huge hit with everyone at the party! It was one of the first dishes to disappear! We forgot to take pictures until a lot of the food was already gone, but here is how the
mostly eaten macaroni turned out.

20090412_Easter_029


Vanessa made her holiday family tradition, Nut Loaf. A vegetarian dish made just like meat loaf but with nuts and cheese and ground mushrooms. It's a crowd pleaser every time.

Cheese and Nut Loaf
Source: The Tassajara Recipe Book (a great vegetarian resource)

2 tablespoons butter or oil
1 onion
1 1/2 cups chopped mushrooms
2 cloves garlic
1 small green pepper
1 teaspoon each dried thyme, savory and marjoram (you can use whatever dried spices you like but I stick within these boundaries)
1/2 teaspoon dried sage
salt and pepper
1 1/2 cups cooked brown rice
1 1/2 cups walnuts, chopped
1/2 cups cashews, chopped
4 eggs
1 cup cottage cheese
3/4 pound grated cheese: cheddar, gruyere, fontina, smoked (whichever you like but I always make sure to use Parm and something smoked)
1/4 cup mixed fresh herbs such as parsley, oregano, thyme

If you have a food processor, you're going to make good use of it. If not, make sure to finely chop the onion, mushrooms, garlic and green pepper and skip to heating the butter or oil up.

In food processor finely chop onion. Heat up butter or oil in a large skillet pan. Throw in onion and cook until translucent. While that is cooking put garlic, mushroom and pepper in food processor and pulse until finely chopped. When the onion is cooked, add the chopped mushroom/garlic/pepper mix, dried herbs and salt and pepper, then cook until soft. Let cool slightly and then put into a large mixing bowl. Add remaining ingredients. Check the seasoning but leave a little undersalted because the saltiness of the cheese will come out later while baking. Liberally butter a 9-inch loaf pan. Put mixture into pan and smooth out the top. Bake for an hour in a 350 degree oven. Take out and let cool 5-10 minutes before serving.

20090412_Easter_027
And scene.

Vanessa also whipped up a Carrot Apple Salad and an Apricot-Mustard Glazed ham (I cheated and bought a pre-cooked ham and just did the glaze/baking part). Oh and deviled eggs.

Hope you all had a lovely Easter!

Love and bunny rabbits,

V and M

20090412_Easter_017