Mulligatawny soup is a great soup for leftovers. The recipe I found was one of those ideas on what to do with leftover Thanksgiving turkey. I didn't have leftover turkey in late January (god forbid) but what I did have was a lot of similar ingredients to the recipe already in my pantry. So I ended up taking this soup and really making it fit what was in my cupboard.
The key to a good mulligatawny is the acidity and the warm Indian spices. The spices are what I would say define this soup. However the rest of the elements can be open to interpretation. I ended up using the traditional lemon and granny smith apple to bring the acidity to the soup but I saw recipes that omitted the apple and just had lemon. I think subbing in lime would work just as well too if that's what you had on hand. Also, the protein can be chicken or turkey but you can use whatever cuts you prefer. Chicken is traditional but using slightly dried out turkey from Thanksgiving leftovers is a perfect option to bring back to life in this soup.
The other element I played with was the grain. The recipe suggested basmati rice but I used red lentils instead because I had just the amount needed on hand. The key if you choose to use lentils is to use the red/orange ones (like these ones) because traditional lentils won't cook up as fast as you need them to in this recipe. So go forth with this knowledge and use what you got and make one hell of a good winter soup, just don't sub out the spices or you'll regret it.
Mulligatawny Soup
adapted heavily from this recipe
4 tablespoons of olive oil
1 medium yellow onion, medium dice
1 medium Granny Smith apple, medium dice
2 medium carrots, medium dice
5 garlic cloves, finely chopped
1/4 cup all purpose flour
1 tablespoon curry powder
1 tablespoon garam masala
1/2 teaspoon cumin
1/8 teaspoon ground cloves
6 cups of chicken stock (we used homemade)
2 lbs chicken boneless skinless chicken thighs
1 1/2 cups red lentils
1 (14 oz.) can unsweetened light coconut milk
1/4 cup fresh squeezed lemon juice
1/2 teaspoon finely grated lemon zest
cilantro leaves for garnish, we also added some avocado on top
1. Preheat oven to 425 degrees. Put chicken thighs in a casserole dish, season with salt, pepper and 2 tablespoons of olive oil. Roast chicken in the oven until temperature reaches 165 degrees internally. Remove from oven and allow to cool. Once cool, dice up into small bites.
2. Heat other 2 tablespoons of oil in a large dutch oven over medium heat. Add onions and allow to cook until soft, about 3 minutes. Add apple, carrots and garlic and season with salt and pepper. Saute until apple is tender and onions are translucent, about 5 minutes.
3. Sprinkle flour, curry powder, garam masala, cumin and cloves over vegetable mixture. Stir until fragrant and flour has cooked down, about 2 minutes.
4. Slowly add stock and stir until flour/spice mixtures is all dissolved. Bring to a simmer and cook until vegetables are soft, about 10 minutes. At this point I chose to use my immersion blender and blend these ingredients together before adding the other meat and lentils. The original recipe didn't say to but I didn't love the idea of eating chunks of cooked apple. I'll leave you to make the call.
5. Add diced chicken, lentils, coconut milk, and lemon juice and return soup to a simmer for about 10 minutes. Stir in lemon zest and season with additional salt and pepper to taste. Server immediately topped with cilantro leaves and avocado (if using).
We also bought some pre-made naan at the store for dipping. Next time I'd love to make some of my own naan at home but since it was a weeknight I decided to choose the quick options.
I made a Vine video for this but unfortunately accidentally erased it so all I have is this pretty picture of the final product. Enjoy!
January 29, 2014
January 24, 2014
Cheesemaking 101 - Mozzerella
Here's a post off the beaten path as this most definitely is not soup. However it is fairly easy yet something that will make you feel accomplished in the end - much like soup. DP and I hosted a classical music listening night at our house and picked Mozart for our first gathering. When deciding upon snacks there were many puns including Mozart-ella sticks, Wolfgang Puck Amadeus pizza, Don Juan almonds and the like. I saw the shining star as clearly being Mozart-ella so I took the opportunity to teach myself how to make this easy cheese. It turned out really good despite my worry throughout the process that it wouldn't come together. But come together it did and served with fresh basil and garlic, our best olive oil (from here), balsamic, and a sprinkle of red pepper flakes and it was a party hit. It turns out that the adage used when making beer applies to making cheese as well - don't worry, have a homebrew cheeseball.
Even though this recipe might require a stop at a home brewing store the two off the wall supplies needed, rennet and citric acid, are cheap and easy to find. Also you use so little of each ingredient in each batch that I'll be able to stretch the amounts I purchased for many more cheese making adventures. Up next, goat cheese...or maybe feta! A little aside about the whey too; I read from the recipe that the leftover whey can be used in place of water in any bread recipe for an enhanced flavor so I saved mine and will be whipping up a fresh batch of bread this weekend. Cheese making yields many treats my friends.
Homemade Mozzerella
recipe from The Pioneer Woman
1 gallon of whole milk - preferably raw and unpasteurized if you can find it (I couldn't)
1 1/2 teaspoons of citric acid powder
1/4 teaspoon vegetable rennet
kosher salt to taste
Sprinkle the citric acid powder into a large non-reactive stockpot then add 1/4 cup of water and swirl to dissolve. Pour the gallon of milk into the pot and stir to combine. Put the pot over medium-low heat and attach a thermometer to the side of the pot and allow to heat to 90 degrees F. You may notice a little curdling but this is a good thing. While that heats up combine the vegetable rennet with 1 cup of water.
When the milk comes to temp remove from the burner and add the rennet/water mixture. Very gently stir together for about 30 seconds. Place a lid on the pot and walk leave it alone for exactly 5 minutes - don't touch it in the meantime! After 5 minutes the mixture should resemble a very soft custard. A note on this - mine looked more like large curds and didn't congeal as much as the recipe pictures looked. I think this is because I didn't use raw milk so if you don't either and it just looks like a bunch of large curds, don't worry it will still come together. Return to the burner over medium heat and place the thermometer on once again and bring up to 105 degrees F.
Remove from heat and with a slotted spoon remove all of the curds from the whey (the watery looking part) and place in a colander. Press down with a spoon or your clean hands to remove as much of the whey from the curds as possible. Place in a microwaveable bowl and microwave on high for 1 minute. Without burning your hand press on the cheese to drain all of the whey off. Microwave for 30 seconds a few more times to keep removing as much of the watery whey as possible. I only did this two times total. Then knead in salt to taste. Stretch out the cheese curd to get any more whey that you can out of it. Shape into a ball and place in a bowl of ice water until completely cool. Afterwards eat as is or add herbs, seasonings and serve with a crusty baguette as we did.
The final product before it was devoured:
Video of the making:
January 20, 2014
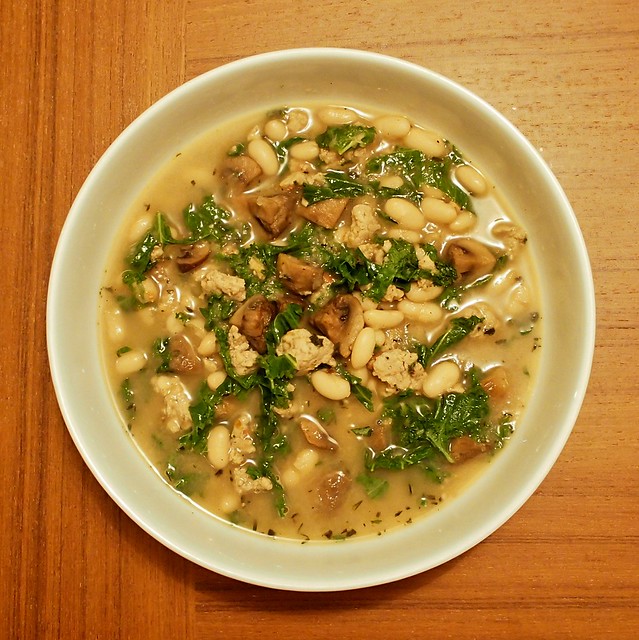
Roasted Mushroom, White Bean, and Kale Soup
This soup is deceptively amazing. I know that it looks so normal and sounds boring, but somehow as if by by magic these totally normal ingredients combine to make a totally soul-warming soup, perfect for a cold winter day. It is this type of magic that makes me love soup!
In addition, though this soup is creamy in appearance and texture, there is not a drop of cream or cheese in it, making it a healthy alternative to richer winter soups. This soup could easily be adapted to be vegetarian or vegan without sacrificing anything, simply by leaving out the sausage and using vegetable broth instead of chicken broth.
Inspired by this post, I made a handful of changes that I think made this soup extra amazing. I will be remaking this again and again. Here is the recipe as I made it:
Roasted Mushroom, White Bean, and Kale Soup.
Watch the magic!
In addition, though this soup is creamy in appearance and texture, there is not a drop of cream or cheese in it, making it a healthy alternative to richer winter soups. This soup could easily be adapted to be vegetarian or vegan without sacrificing anything, simply by leaving out the sausage and using vegetable broth instead of chicken broth.
Inspired by this post, I made a handful of changes that I think made this soup extra amazing. I will be remaking this again and again. Here is the recipe as I made it:
Roasted Mushroom, White Bean, and Kale Soup.
Ingredients:
- 16 oz. mushrooms, quartered (I used plain white mushrooms, but a variety would be great)
- 1 large sweet onion, quartered
- 1 regular yellow onion, quartered
- 3 garlic cloves, peeled and slightly crushed
- 2 tablespoons olive oil
- 1 teaspoon salt
- 1 teaspoon pepper
- 10 fresh sage leaves
- 10 stems + 1 tablespoon leaves fresh thyme*, divided
- 3 garlic and herb chicken sausages, casings removed (leave out for a veg version)
- 4 cups chicken broth (vegetable broth can be substituted for a veg version)
- 2 cans (15 oz) white beans, drained but not rinsed (I used great northern but cannellini would also work)
- 1 bunch of kale, ribs removed, sliced thin (I had about 4 cups once chopped up)
- Additional salt and pepper for seasoning
Instructions:
- Preheat oven to 450°F.
- Toss mushrooms, garlic and onion in olive oil, adding 1 teaspoon salt, and 1 teaspoon pepper. (I separated the mushrooms from the onions and garlic before roasting because later you want them separate! You can separate them after roasted if that's easier for you.)
- Spread on baking sheet. Add sage leaves and stems of thyme and toss them around slightly so they get a little bit coated with the oil. Roast in the oven for 10 minutes then toss everything around a bit and roast for an additional 15 minutes.
- While vegetables are roasting, pour a glug of olive oil into a dutch oven and warm over medium heat. Add the sausage and cook, breaking the sausage up into crumbles.
- Add 3 cups of the broth, 1 can of beans, a pinch of salt, a few grinds of pepper, and 1 tablespoon fresh thyme leaves to the pot and bring to a simmer.
- When the vegetables are done roasting, let cool slightly. Separate mushrooms from other roasted vegetables (if not already separated).
- Place into a blender the last cup of broth, the 2nd can of beans, along with the roasted onions, roasted garlic, and slightly crispy roasted sage (remove the stems of thyme). Blend until smooth.
- Add pureed bean mixture into the dutch oven, stirring in until smooth. Add roasted mushrooms and chopped kale to the pot.
- Let simmer for about 10 minutes to soften up the kale and let the flavors meld a bit. Taste and add salt and pepper if needed.
- Keep warm over low heat until ready to serve.
- Don't forget a delicious loaf of bread to soak up all the tasty herby broth!
Watch the magic!
January 17, 2014
Chicken Khao Soi
The minute I saw this soup featured
on the cover of March's Bon Appetit I knew I was going to make it at some
point. That bowl had some damn fine curb appeal. I've been saving
this in my back pocket for just such an occasion. Occasion being that
Michelle and I decided to resurrect this here blog of ours. It's not often that
I get to use turmeric in recipes but there's something magical about
that spice. I know it has a ton of health benefits and when you smell it
you really believe that. Not to mention that it stains everything it
touches a beautiful sunny yellow.
I'm hesitant
to say this recipe is easy but only because procuring the ingredients was a bit
of a task. Guajillo chiles and Chinese eggs noodles are a lot harder to
find in this progressive town of ours. But here's a tip from me to you -
go straight to your local Mexican tienda for the chiles, do not pass Go, New Seasons,
Fred Meyer, or Safeway. I did end up finding the Chinese egg noodles at
Safeway after two other fails, so thanks Safeway for throwing me that
bone. The good news is if you have ready
access to those two ingredients the other items are pretty much pantry staples.
The other good news is that this recipe has minimal prep and comes together in
a cinch so it's good for a weeknight meal. DP being the non-dairy eating
asian food loving person that he is really dug this soup. It definitely
lived up to its curb appeal.
Chicken Khao Soi Soup
Khao Soi Paste
4 large dried New Mexico or guajillo chiles,
stemmed, halved, seeded
2 medium shallots, halved
8 cloves garlic cloves
one 2" piece ginger, peeled, sliced
¼ cup chopped cilantro stems
1 tablespoon ground coriander
1 tablespoon ground turmeric
1 teaspoon curry powder
Soup
2 tablespoons coconut oil
2 14-oz. cans unsweetened coconut milk
3 cups chicken broth (we used homemade)
1½ lb skinless, boneless chicken thighs, halved
lengthwise
2 10 oz. packages Chinese egg noodles (we used
Lo Mein egg noodles)
3 tablespoons (or more) fish sauce (such as nam
pla or nuoc nam)
1 tablespoon (packed) palm sugar or light brown
sugar
Kosher salt
Sliced red onion, bean sprouts, cilantro sprigs,
crispy fried onions or shallots, chili oil, and lime wedges ( for serving)
Khao
Soi Paste
Place
chiles in a small heatproof bowl, add boiling water to cover, and let soak
until softened, 25–30 minutes.
Drain
chiles, reserving soaking liquid. Purée chiles, shallots, garlic, ginger,
cilantro stems, coriander, turmeric, curry powder, and 2 Tbsp. soaking liquid
in a food processor, adding more soaking liquid by tablespoonfuls, if needed,
until smooth.
Soup
Heat oil
in a large heavy pot over medium heat. Add khao soi paste; cook, stirring
constantly, until slightly darkened, 4–6 minutes. Add coconut milk and broth.
Bring to a boil; add chicken. Reduce heat and simmer until chicken is
fork-tender, 20–25 minutes. Transfer chicken to a plate. Let cool slightly;
shred meat.
Meanwhile,
cook noodles according to package directions.
Add
chicken, 3 Tbsp. fish sauce, and sugar to soup. Season with salt or more fish
sauce, if needed. Divide soup and noodles among bowls and serve with toppings.
This video was cracking me up all last night because of the part where I forgot to turn it off and it caught me putting it in my sweater pocket and singing to Bonnie Raitt.
Labels:
asian,
chicken,
chicken broth,
ginger,
soup
January 13, 2014
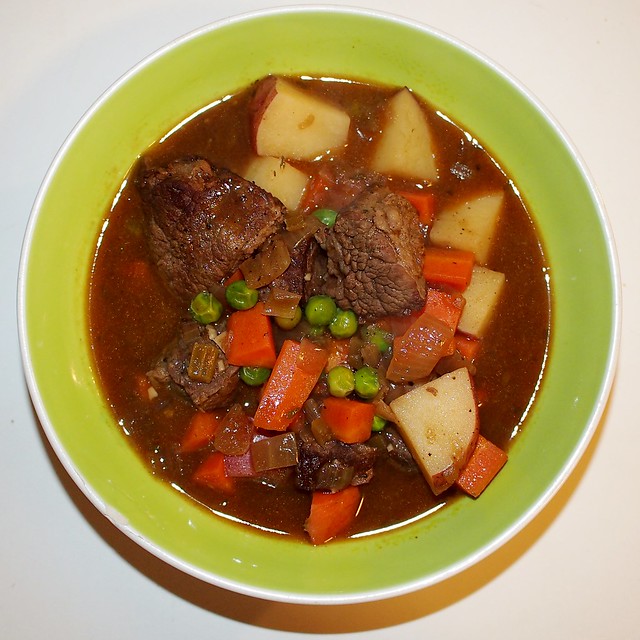
Beef Stew
Beef stew, a classic!
I have made beef stew multiple times, always different variations and methods, but this was by far the best beef stew I have made.
Browning the meat is the thing that takes the longest hands on time and makes this recipe seem a lot more daunting than it is. It does take time, but if you can be patient with the searing of the meat (not a strong suit of mine!), you will be rewarded with the most flavorful broth and you will not believe you haven't been doing it this way all along. I know that throwing the ingredients into a crockpot seems so much simpler but really, you are missing out! Make this on a weekend when you can take a little extra time. Trust me.
I used this recipe from The Kitchn to make the most flavorful, rich, hearty, and comforting bowl of beef stew ever, and here is the recipe as I made it:
Classic Beef Stew
Serves 6-8
Total time: about 3 to 4 hours.
Ingredients:
4 pounds beef chuck roast
1-3 tablespoons vegetable oil, divided
2 medium onions, diced
3 celery stalks, diced
3 cloves garlic, minced
2 tablespoons tomato paste
2 tablespoons Worcestershire, divided
1 teaspoon salt
3 tablespoons all-purpose flour
1 cup red wine, plus extra to finish
3 sprigs fresh thyme (or 2 teaspoons dried)
1 bay leaf
4 cups chicken stock
3 carrots, diced
1 ½ pounds red potatoes, cubed
1 cup frozen peas
Salt and pepper
Instructions:
1. Trim off any large pieces of fat from the outside of the roast, and cut it up into relatively even bite-sized cubes. Use a sharp knife and if you are having trouble, freeze the meat for just a little while to make it less jiggly.
2. Set a large dutch oven over medium-high heat (on the hotter side of medium hot) and pour in enough oil to cover the bottom of the pan. When the oil is hot enough that a drop of water sizzles when it hits the oil, it's ready. Add a single layer of beef cubes to the pan and sprinkle them generously with salt and pepper. (Do not overcrowd the pan! I did about 6 batches of searing.) Let the beef cook without touching it for about 5 minutes, until the bottom sides develop a dark brown crust and come away from the pan easily, without forcing it. Flip them and let them cook again undisturbed for about 5 minutes. If the pan is a little dry, add a little more oil. Once seared, remove to a plate and repeat this process until all of the beef is beautifully brown on the outside. Don't forget to salt and pepper each batch! This process took me probably an hour.
3. An important step to this stew is the development of the "fond", a sticky dark glaze that forms on the bottom of the pan. It may look gross but it is just delicious flavor! Don't worry about it unless it starts smoking or smells like burning. If this happens, add a little bit of water to dissolve it and then pour that liquid over the cooked beef.
4. Once the beef is all seared and sitting aside on it's plate, turn down your burner to medium and give it a chance to cool down a little (I removed my pot for about 5 minutes for this to happen with my electric stove). Put the pot back on the burner and add another tablespoon of oil. Add the onions and celery, cooking until the onions are softened and translucent, about 10 minutes. Add the garlic and cook until fragrant, about 30 seconds. Stir in the tomato paste, salt, and one tablespoon of the Worcestershire sauce and stir it around so it is all mixed in.
5. Sprinkle the flour over the vegetable mixture and stir until there is no more visible flour and everything is coated in flour and looks mushy.
6. Raise the heat back up to medium-high and pour in the wine. It will bubble and smell delicious. Stir and scrape the sticky fond coating from the bottom of the pan and keep stirring until the fond is all dissolved and the wine has reduced and thickened slightly.
7. Return the seared beef to the pan along with the broth, whole thyme sprigs, and a bay leaf. Stir to combine.
8. Bring the pot to a low boil, and reduce heat to low. Cover the pot and let it cook for 1 and 1/2 hours. Stir occasionally and make sure the stew stays at a very low simmer.
9. Add the potatoes and carrots to the stew. Cover the pot again and continue simmering for another 45 to 60 minutes, until the potatoes are cooked through and the meat is very tender, falling apart easily.
10. Add the peas along with the remaining tablespoon of Worcestershire sauce and a splash of red wine. Remove the thyme stems and the bay leaf. Taste at this point and add any additional salt, pepper, or anything else you might like in your stew. Paprika would be nice, or maybe more garlic? I didn't add anything but salt and pepper and I am glad I kept it simple. Serve with a nice loaf of bread and a salad if you are being good.
Note: This stew freezes beautifully so don't be alarmed by how much it makes! Freeze your leftovers for a rainy day!
Watch me make this soup:
January 7, 2014
Tuxedo Chicken Chili and Baked Polenta
New years day is sometimes more of a mixed bag than New Year's Eve is. I find that there tends to be a little bit of regret - from the night before, hopefulness - for the year to come, and some relief - for getting to wipe the slate clean. This year a group of us got together at the Adrift Hotel in Long Beach, WA to eat a good meal, spend some time together gussied up and drink way too much because of the short distance it takes to stumble back to your room.
The next day left me going through my mixed bag of emotions which led me to make this soup. It had a fancy title, sounded healthy, and little chopping was required for my hungover lazy self. I expected this soup to be good but it actually turned out to be incredible. I measure that based off of the number of times DP and I both swoon and mmmm while scarfing it down. There were a lot of those on this one my friends.
I ended up adding the baked polenta for a few reasons. I wanted something to dip in the soup but there's always that moment when we're on our best behavior when one of us decides that bread is just too unhealthy. I was still determined though so I thought about making some simple focaccia but alas, I was almost out of flour. So I landed on polenta which is so easy to whip up. Because I wanted it to have a crispy exterior to mimic bread I let it cool in the fridge then sliced it up and baked it on a cookie sheet at high heat. It did the trick! Every time I make polenta, either in soft or baked form, I always remind myself not to overlook this gem for any other suitable application. The only thing I'd do differently is cut it up smaller so it has more crispiness and then bake it a little longer and finish it off with a few minutes under the broiler.
The original recipe for the chili comes from Food 52 and the baked polenta recipe is an adaptation of this one. Below are the recipes as I made them.
Tuxedo Chicken Chili
Serves 6
I did also manage to take this video for you:
The next day left me going through my mixed bag of emotions which led me to make this soup. It had a fancy title, sounded healthy, and little chopping was required for my hungover lazy self. I expected this soup to be good but it actually turned out to be incredible. I measure that based off of the number of times DP and I both swoon and mmmm while scarfing it down. There were a lot of those on this one my friends.
I ended up adding the baked polenta for a few reasons. I wanted something to dip in the soup but there's always that moment when we're on our best behavior when one of us decides that bread is just too unhealthy. I was still determined though so I thought about making some simple focaccia but alas, I was almost out of flour. So I landed on polenta which is so easy to whip up. Because I wanted it to have a crispy exterior to mimic bread I let it cool in the fridge then sliced it up and baked it on a cookie sheet at high heat. It did the trick! Every time I make polenta, either in soft or baked form, I always remind myself not to overlook this gem for any other suitable application. The only thing I'd do differently is cut it up smaller so it has more crispiness and then bake it a little longer and finish it off with a few minutes under the broiler.
The original recipe for the chili comes from Food 52 and the baked polenta recipe is an adaptation of this one. Below are the recipes as I made them.
Tuxedo Chicken Chili
Serves 6
- 1 medium white onion
- 2 cloves garlic
- 1 tablespoon vegetable oil
- 1 lb ground chorizo chicken (available at New Seasons Market)
- 1 lb ground dark meat chicken (feel free to just sub 2 lbs of this and crank up the spices if you can't find chorizo chicken above)
- 2 teaspoons dried oregano (preferably Mexican)
- 2 teaspoons cumin
- 1 1/2 teaspoon chili powder
- 1 teaspoon ground black pepper
- 1/2 teaspoon cinnamon
- 1 cup water
- 3 (15) ounces cans canellini beans
- 4 cups chicken broth
- 1 (16) ounce can black beans
- 1 (16) ounce package frozen corn
- 1 (4.5) ounce can chopped green chiles
- Garnishments - sour cream, cheddar cheese, cilantro, and/or baked polenta below
- Chop the onion and garlic finely. Add to the oil in a large Dutch oven. Saute over medium high heat until soft and translucent. Do not brown. Remove the onions and garlic to a bowl and set aside. (If the onions brown and overcook, the final color of the chili will be muddy. It will still taste delicious, but won’t look as nice). Add all of the ground chicken to the pan and cook until browning slightly, breaking it up into small pieces.
- Sprinkle the oregano, cumin, chili powder, pepper and cinnamon over the chicken. Add the onions and garlic. Pour in two cups of chicken broth and one cup of water and bring to a boil. Lower heat to a simmer and cook until the water has reduced by half and the chicken is cooked through.
- Meanwhile, drain and rinse two cans of white beans. Place the beans in a blender (don't be an idiot like me and think a food processor will work just as well, you'll end up with stock all over your counter) with the chicken broth and puree until smooth. Drain and rinse the remaining white beans and the black beans. Pour the pureed beans into the chicken mixture, stir well and bring to a boil. Lower the heat to medium, add the remaining drained beans, corn, and green chiles and simmer until cooked through and thickened, about 30 minutes.
- Serve in big bowls topped with grated cheddar cheese, polenta squares and some cilantro if you've got it (I didn't).
- 2 cups polenta (also known as corn grits)
- 8 cups water
- kosher salt and black pepper
- 3 tbs butter
- 1/4 cup buttermilk, cheese, or anything else creamy you may have on hand
- Bring the water to a boil in a large pot with 1 tbs kosher salt. Gradually whisk in the polenta and whisk after all the polenta has been added to make sure no lumps form. Turn heat down and simmer for 30 minutes until thick, stirring frequently.
- Remove from heat and whisk in butter and any creamy item you may be adding to the mixture. Add salt and pepper to taste.
- Pour into 9x13 casserole pan and put in refrigerator to cool for at least 30 minutes. Preheat oven to 450 degrees.
- Remove the polenta from the refrigerator and slice the cooled polenta into long 1 inch strips. Slice the strips perpendicular to create 1 inch pieces. Place the polenta squares onto a baking sheet lined with parchment paper and put into the preheated oven for about 20 minutes or until they have turned golden and browned on the edges. Remove the baked polenta squares from oven and place on a cooling rack. The polenta squares can be served warm with a dipping sauce or at room temperature. To reheat the squares, place in oven at 200 degrees for several minutes. Can be stored in an airtight container for several days.
I did also manage to take this video for you:
Labels:
basic,
chicken,
chicken broth,
chili,
meaty,
quick and easy,
sausage,
soup,
spicy
January 2, 2014
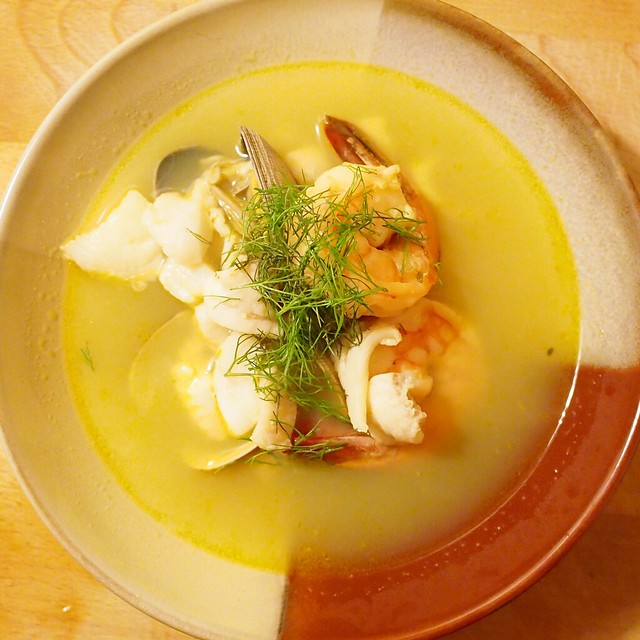
Bouillabaisse
Happy new year! We are back with more soups than you can shake a stick at!
What better way to revive a blog than with a fresh makeover and a beautiful soup that is so much easier than the name would imply. We noticed we did not really have any seafood recipes on this old blog, so we decided to jump into the fanciest sounding fish stew around, Bouillibaisse. Here is our feedback on the outcome:
Vanessa says:
Full disclosure - I'm not a huge fan of seafood and consider it my least adventurous side with it comes to eating. Overall I think the best part of this soup was the broth. There was something so rich about the subtle orange flavor and the saffron gave it the most beautiful color. Even though I don't think we overcooked the fish it was still a bit rubbery for my liking, possibly because that was the only texture to the whole soup. I found myself brainstorming ways to use this broth in other soups but without fish or maybe just less fish and other items added in. However if you are a big seafood fan then you will think this soup is the bee's knees!
Michelle says:
In contrast to Vanessa, I love seafood and I was excited to make this extravagant-sounding soup that I had never even eaten before. Though it seemed a shame to strain everything out, the broth was amazing! So vibrant and fragrant, infused with citrus, herbs, and saffron. I could have drank a gallon of this stuff. If I made this soup again I would maybe add even more herbs, or just a different combination. Oregano seems to be used in this soup most often and when I was buying the herbs the store was out of oregano! So I grabbed tarragon and marjoram in its place. I agree with V that the texture of this soup was not the most interesting or varied, but I still loved it. Maybe a different combo of seafood would make a difference. Adding some potatoes after straining but before adding the fish would be a good way to bulk up this soup if you did not want bread or if you just wanted a heartier stew.
We used this recipe from Steamy Kitchen as a starting point, and here is the recipe as we made it:
Bouillabaisse
Serves 6
Ingredients:
3 tablespoons olive oil
1 leek, white and light green parts only, chopped
1 onion, chopped
2 cloves garlic, minced
peel of 1 orange (a vegetable peeler works great)
3 tomatoes, chopped
1/3 cup chopped fennel bulb (reserve fronds for garnish)
a bunch of fresh herbs (we used parsley, thyme, tarragon, and marjoram)
1/2 teaspoon saffron threads, crushed
10 cups fish stock (see original post for help making your own fish stock)
1 cup dry white wine
1 tablespoon sea salt
3 pounds of assorted fish and shellfish (clams and mussels scrubbed clean). We used 1 lb clams, 1 lb petrale sole, 1/2 lb prawns, and 1/2 lb sea scallops. Other options would be salmon, lobster, crab, mussels, bass, etc.
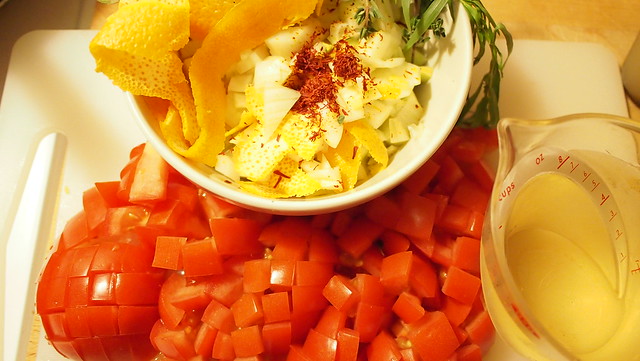
Seriously isn't this the most gorgeous pile of ingredients?? The fish was also beautiful and I am a little sad we did not take a proper photo of it, especially the clams!
Directions:
1. In a large stockpot, heat the olive oil on medium heat. When hot, add the leek, onion, and garlic. Saute for 5 minutes until onions are softened but not brown.
2. Add to the pot the orange peel, tomatoes, fennel bulb, fresh herbs, saffron, wine, fish stock, and salt. Turn the heat to high and bring to a boil. Then turn the heat to low and simmer for 30 minutes. Strain the soup into another large pot.
3. Bring the strained soup to a boil over medium high heat. Taste the broth at this point and add additional salt if needed. The soup should be slightly salty, as this adds to the flavor of the fish.
4. Add in the seafood, adding in the items that require the most cooking time first. If you have whole lobster tails or large crab claws, add them in first and give them a 2 minute head start. Clams come next, then mussels and extra large shrimp, lastly the fish, scallops, and any smaller shrimp. Be careful not to overcook the seafood. This should take about 4 to 5 minutes and then turn off the heat.
5. Ladle this glorious soup into each bowl with the seafood and garnish with fresh fennel fronds. Ooh and aah as you slurp. And don't forget to get some delicious rustic bread to dunk in the broth!
Here is a quick video of how this process went:
Enjoy!
Subscribe to:
Posts (Atom)